
QuickBooks Integration
Connect a LithosPOS store to QuickBooks Online and every closed register posts automatically, either as a sales receipt and refund receipt or as a summary journal entry, with totals that match the POS.
The QuickBooks integration posts each store's sales to QuickBooks Online for you. When a register is closed, LithosPOS sends what the register took to QuickBooks, so your books match the register close report without manual entry. Each store is connected, mapped and monitored from Integrations > QuickBooks in the Back Office.
What the integration does
- Posts every closed register automatically. LithosPOS checks for closed registers once a day, at 06:00 UTC. Sync now posts one straight away.
- Sales and returns are posted separately. Each register posts its sales and its returns as two postings, numbered
LP<register>-SandLP<register>-R(for exampleLP62-Sfor register 62). The register's business date is the transaction date. - Totals match the POS. Revenue is posted net of every discount, voided bills and inactive returns are left out, and the tax is the tax the till charged. A register whose figures do not add up is held instead of posted.
- Nothing is posted twice. The fixed document numbers make syncing again, retrying and posting an earlier register safe.
- Several stores, one or many companies. Each store connects to one QuickBooks company. Stores can share a company and be told apart by Location and Class.
- Everything is visible. Each store has a History of every posting, with what QuickBooks recorded, the reason a register was held, and Retry.
Choose a posting mode
Each store posts in one of two modes. You choose it once, when you set the store up.
Sales Receipt (recommended)
- A register's sales post as one sales receipt and its returns as one refund receipt.
- One line per item group and tax code, so QuickBooks reports show sales by item group.
- Tax is recorded per line with the QuickBooks tax code you map, or with US automated sales tax.
- Each payment type is recorded with its QuickBooks payment method and deposited to the account you choose, or to Undeposited Funds.
- Tips, gift vouchers sold, card surcharges and on-account sales are posted on items and accounts you choose.
- You map item groups, taxes, payment types, delivery partners, charges and discounts.
Journal Entry
- A register's sales post as one journal entry, and its returns as a second, reversing one.
- All sales go to one Sales account and all tax to one tax-payable account.
- Each payment type is debited to its own bank or clearing account.
- Tips, gift vouchers sold, card surcharges and on-account sales are not supported: a register with any of them is held.
- You map four accounts, payment types and delivery partners.
Read more in QuickBooks Sales Receipt mode and QuickBooks Journal Entry mode.
Before you start
- You need a QuickBooks Online company and a QuickBooks user who can approve app connections. Consolidated books (several stores in one company, split by Location) need QuickBooks Plus or Advanced.
- Make sure the store's taxes, payment types and item groups (categories) are set up in LithosPOS. Every item group and tax the store sells will need a match in QuickBooks.
- The QuickBooks app must be installed in Integrations.
Connect a store
- In the Back Office, go to Integrations and open QuickBooks under Accounts.
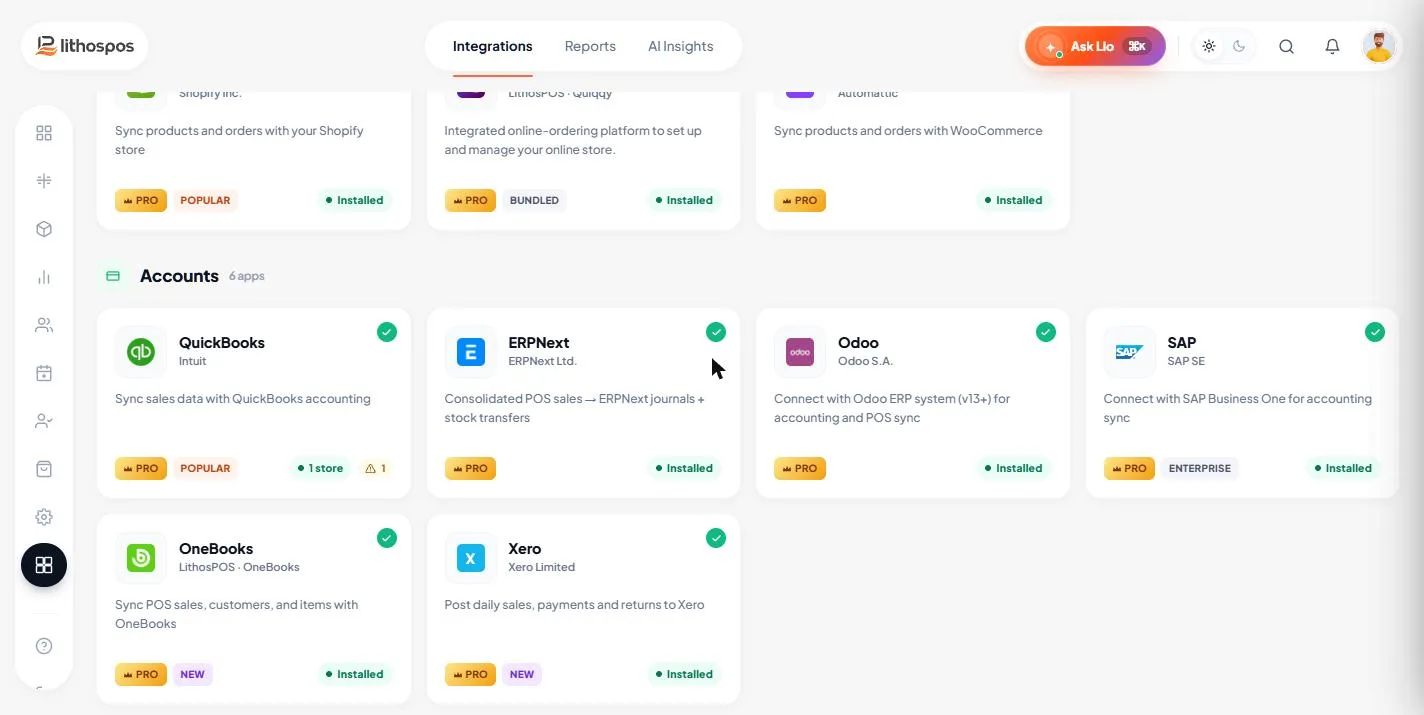
- Click New connection, or Connect stores if some stores are not connected yet. The connection takes about three minutes, and you can stop and finish later: the store is listed as Setup incomplete until you do.
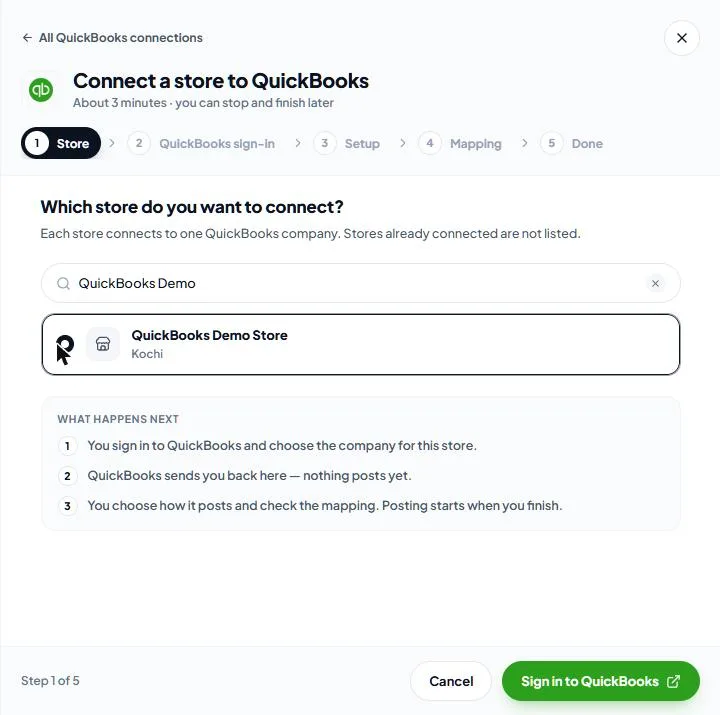
Step 1: Choose the store
Pick the store to connect. Each store connects to one QuickBooks company; stores that are already connected are not listed. Click Sign in to QuickBooks.
Step 2: Sign in to QuickBooks
QuickBooks opens. Sign in, choose the company this store should post to, and approve the connection. You come back to LithosPOS with the company name, its country and the tax handling that was detected. Nothing has been posted yet.
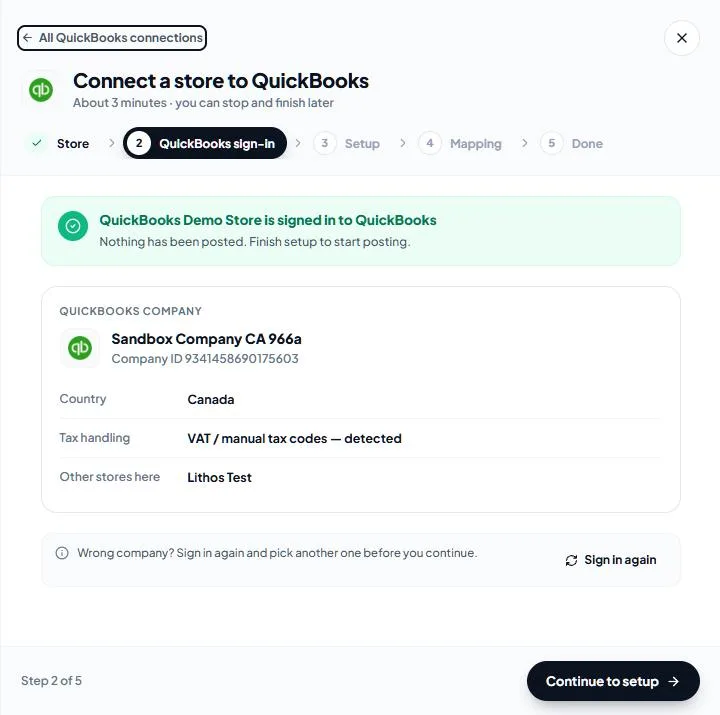
The tax handling follows the company's country:
- US automated sales tax — QuickBooks is told not to recalculate tax; LithosPOS sends the exact tax each register charged. There are no taxes to map.
- VAT / manual tax codes (UK, EU, GCC, Canada, Australia and others) — each LithosPOS tax is mapped to a QuickBooks tax code.
- India GST — each LithosPOS tax is mapped to a QuickBooks GST code.
Click Continue to setup.
Step 3: Choose how the store posts
- Start from another store's setup — if another store already posts to the same QuickBooks company, turn this on to copy its posting mode, books, accounts and mapping.
- Posting mode — Sales Receipt or Journal Entry (see Choose a posting mode).
- Books
- Separate — each store posts to its own QuickBooks company.
- Consolidated — several stores post to one company, split by Location and Class. Turn on Track locations in QuickBooks (Settings > Account and settings > Advanced > Categories) and create a Location for each store. Choose the store's QuickBooks Location (required) and, optionally, a QuickBooks Class. Every document the store posts carries them.
- Start posting from — registers closed on or after this date post automatically. Earlier registers can be posted one at a time from History.
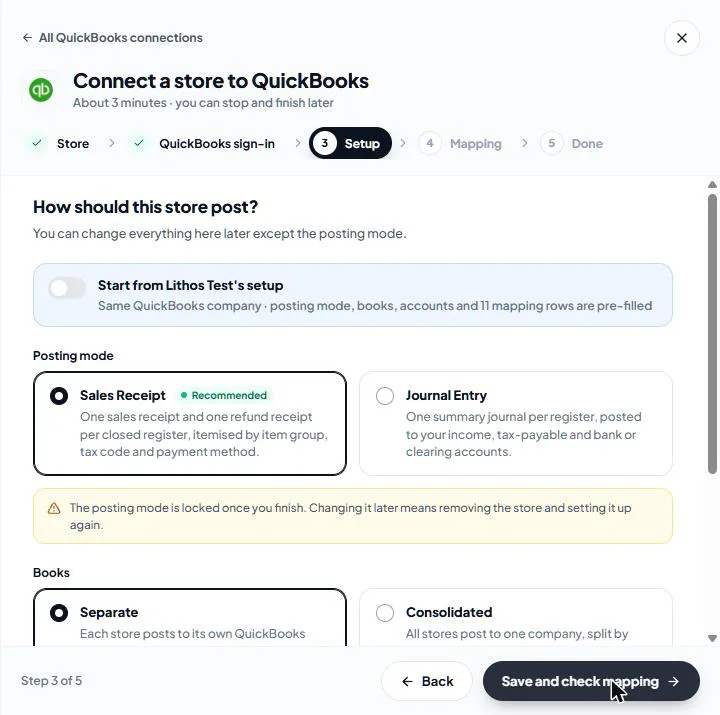
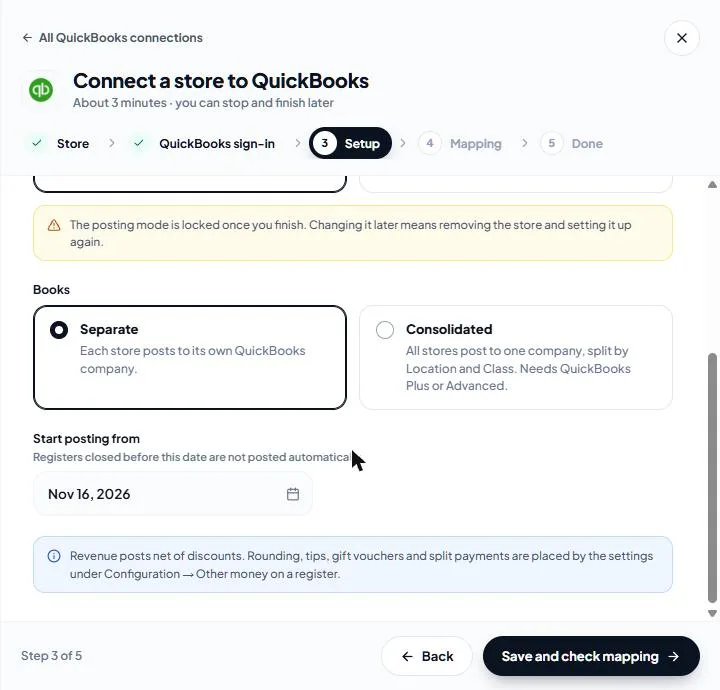
Click Save and check mapping.
Step 4: Map LithosPOS to QuickBooks
Mapping tells LithosPOS which QuickBooks record to use for each LithosPOS item group, tax, payment type and charge, or, in Journal Entry mode, which accounts to post to. Rows whose names match something in QuickBooks are filled in as suggestions; check them and click Save mapping.
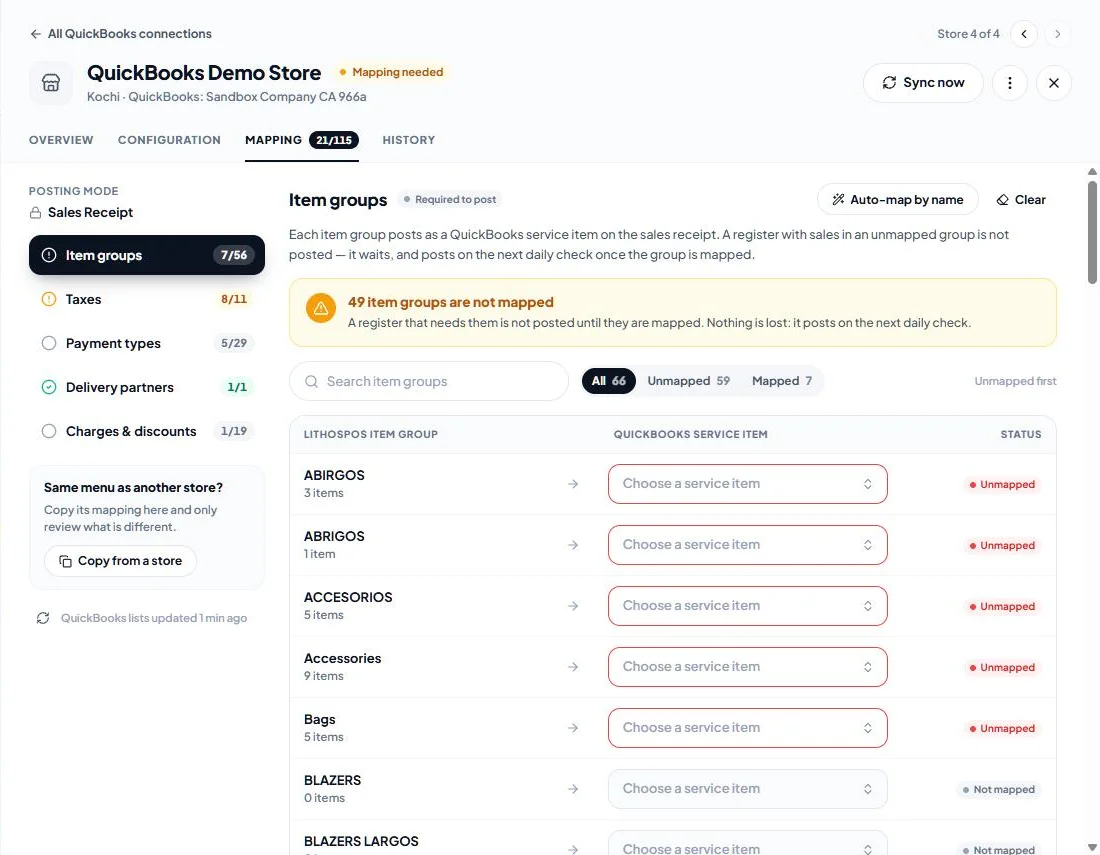
The sections depend on the posting mode. They are explained in Sales Receipt mode and Journal Entry mode. You only have to map what the store sells; anything left can be finished later in the store's Mapping tab.
Step 5: Finish
Click Finish and start posting. The summary shows the QuickBooks company, posting mode, books, posting start date and how many mapping rows are still open.
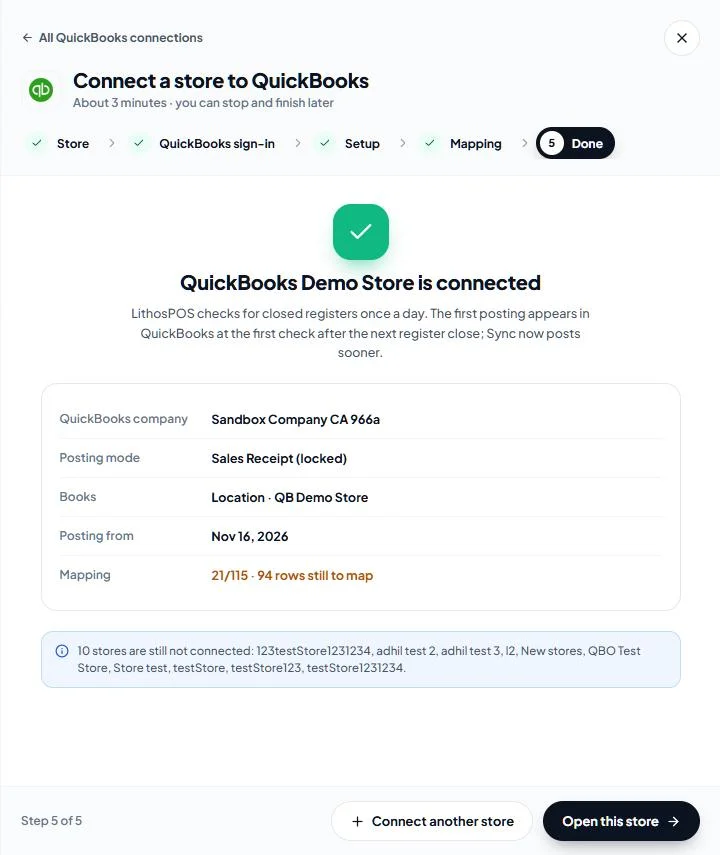
Click Open this store to check its configuration. In Sales Receipt mode, also set up other money on a register (clearing account, rounding item and the like) before the first register closes.
After you connect
- QuickBooks Sales Receipt mode — mapping, other money on a register, payments, refunds and what a register looks like in QuickBooks.
- QuickBooks Journal Entry mode — the four accounts, payment types, the preview and what a journal holds.
- QuickBooks posting history and fixes — History, Sync now, Retry, Post an earlier register and every rejection reason.
- QuickBooks store management — connection statuses, the store overview, configuration, pausing, reconnecting, copying a setup and removing a store.
Connect with us to know more
To learn more, book a meeting with our team.
Was this article helpful?