
ERPNext
LithosPOS now integrates seamlessly with ERPNext, enabling businesses to manage retail and F&B operations more efficiently. This integration connects your POS with ERPNext's powerful ERP modules, ensuring smooth synchronization of sales, inventory, and accounting data.
LithosPOS now integrates seamlessly with ERPNext, enabling businesses to manage retail and F&B operations more efficiently. This integration connects your POS with ERPNext's powerful ERP modules, ensuring smooth synchronization of sales, inventory, and accounting data.
This feature is highly beneficial for businesses that need centralized control across multiple outlets or want to automate backend operations such as accounting, purchasing, and stock management.
Key Benefits
- Centralized Data Management: All sales, stock, and financial data from LithosPOS sync directly with ERPNext, reducing manual work.
- Accurate Accounting: Sales and payment data flow automatically into ERPNext’s accounting module, ensuring error-free financial records.
- Real-Time Inventory Sync: Stock levels update instantly in ERPNext when items are sold in LithosPOS, helping avoid over-selling or stock-outs.
- Improved Decision-Making: With consolidated reports in ERPNext, businesses can analyze sales, profits, and stock trends across locations.
- Seamless Workflow: Automates order-to-invoice and purchase processes, saving time and operational costs.
- Scalability: Perfect for multi-store businesses or chains that need centralized ERP management.
Table of Contents – LithosPOS & ERPNext
- Introduction: What this integration does Benefits for your business
- Setup in LithosPOS Back Office: Enabling ERPNext Adding connection details
- Basic Configuration: Mapping products and categories Syncing inventory, sales, and customers Payment and tax settings How data flows between LithosPOS and ERPNext
Back Office Settings in LithosPOS
- Enabling ERPNext: Log in to LithosPOS Back Office.
- Navigate to Integrations > ERPNext.
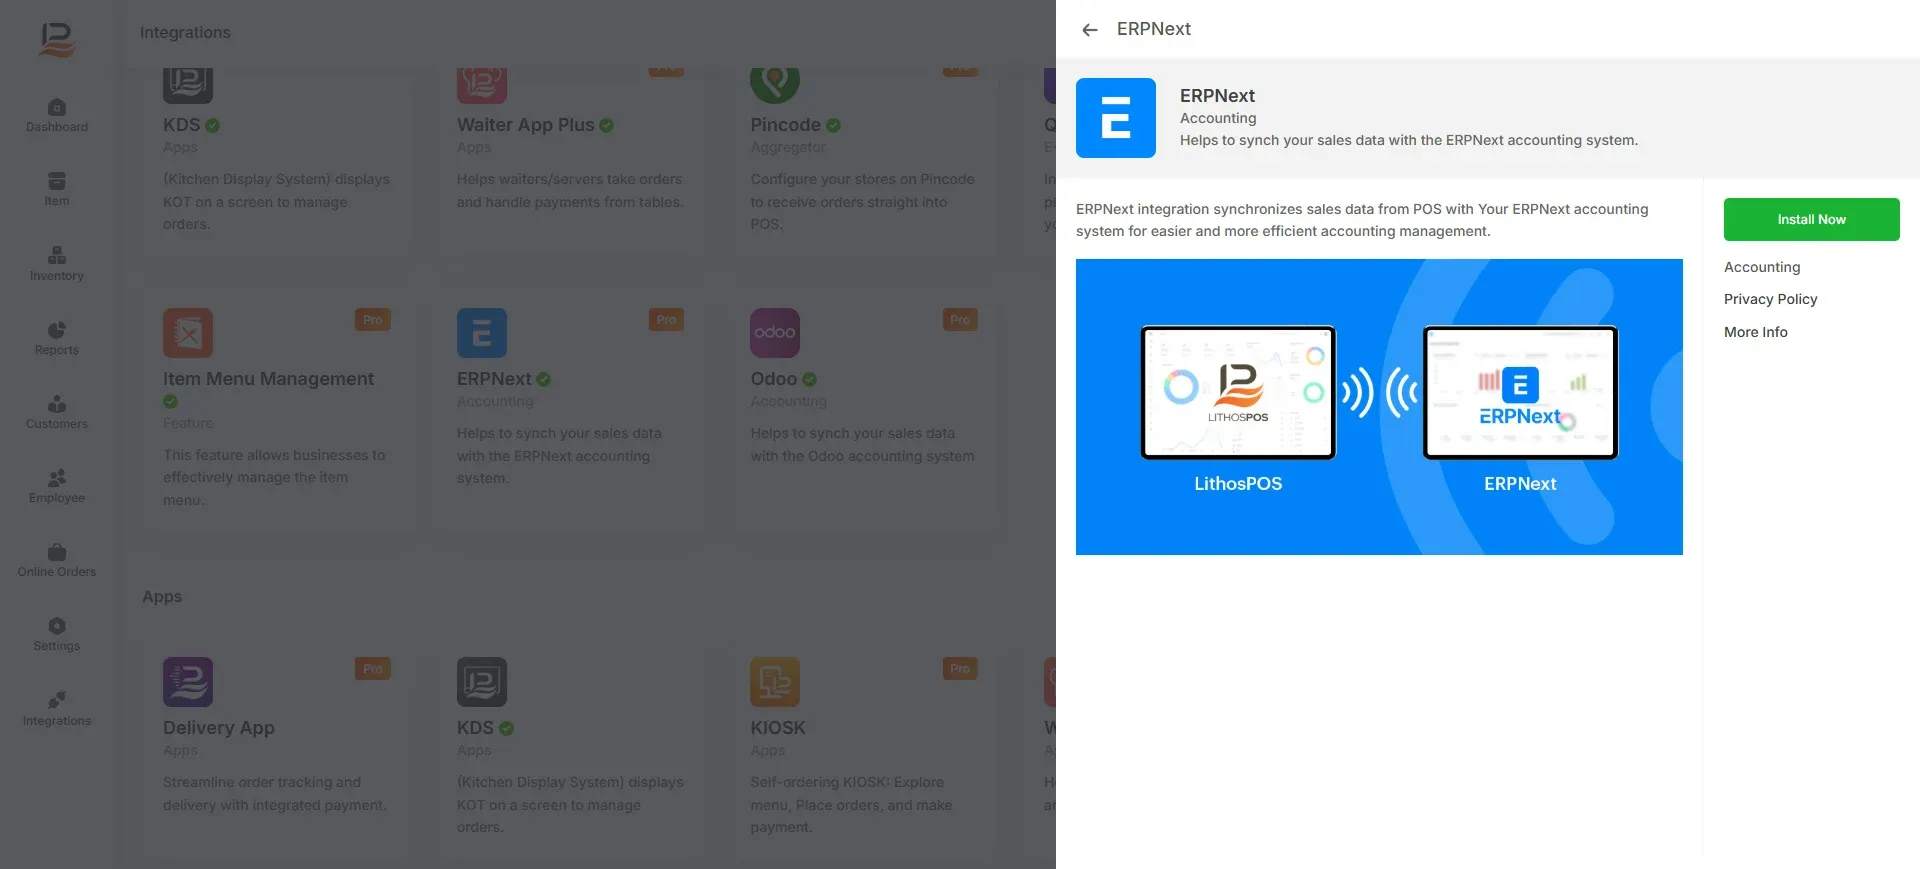
- Click on the ‘Install Now’ button.
- Then click +New connection.
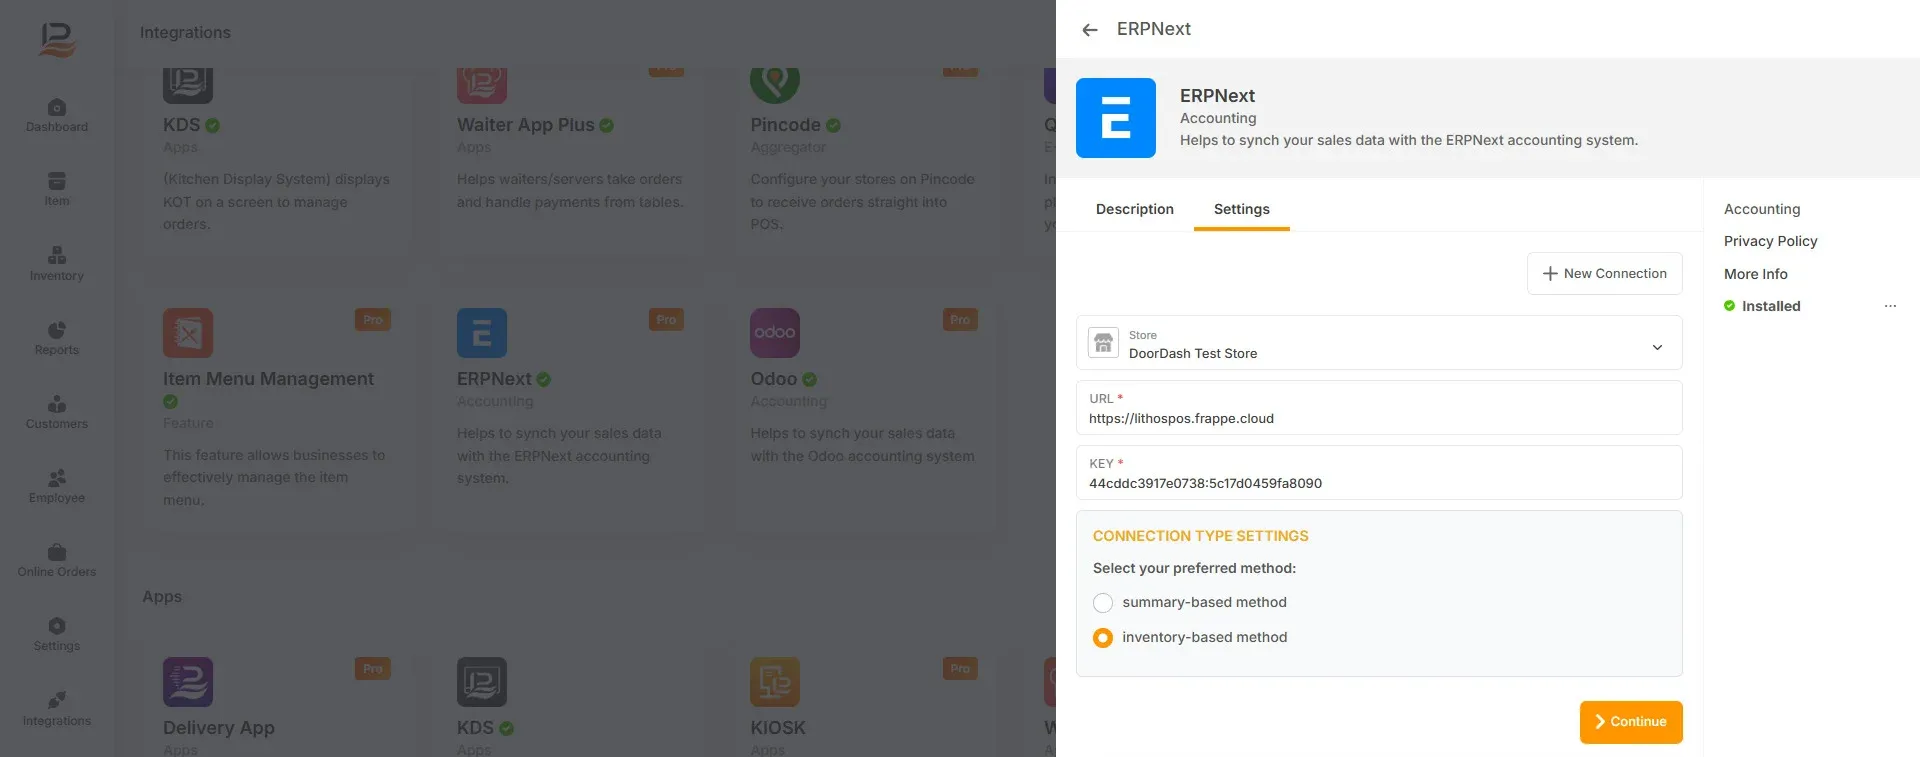
Enter ERPNext Connection Details
- Select Store from the store list.
- URL/ERPNext Domain:. Your ERPNext instance link (e.g., https://yourcompany.frappe.cloud.com).
- Key: Generate an API key from ERPNext user settings and paste it here.
- Then select the Connection Type
Mapping Settings
- Store Mapping: Map your store with the corresponding ERPNext stores manually.
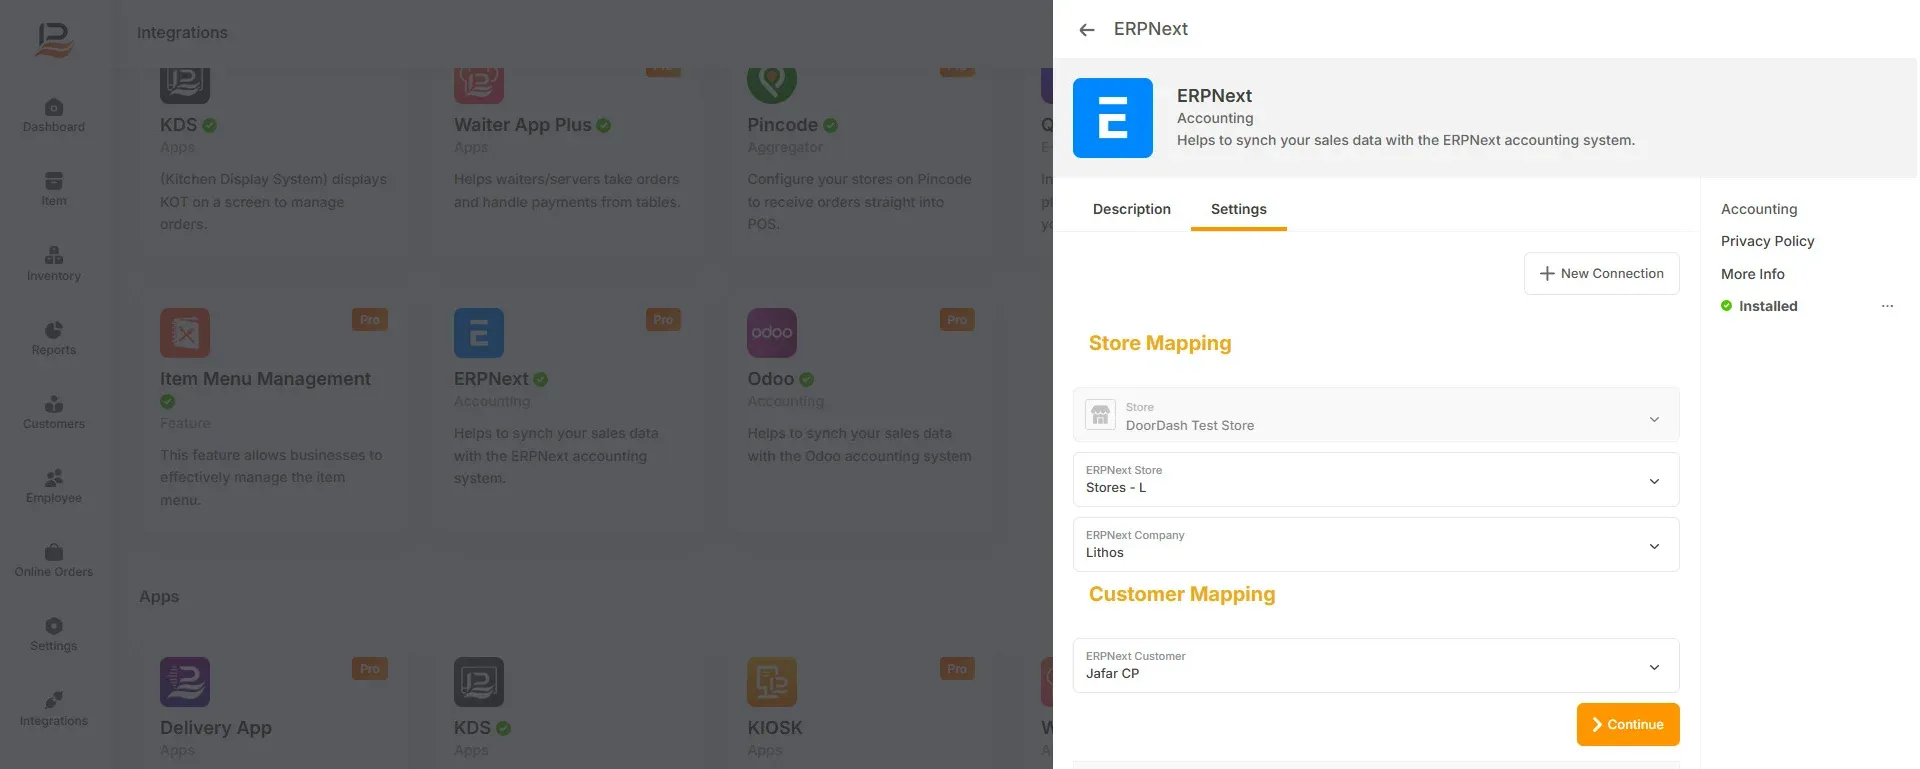
- Customer Mapping: Select the customer that you created in ERPNext to synchronize sales data for non-registered customers (in LithosPOS, these are called “Walk-in Customers”). Then click Continue.
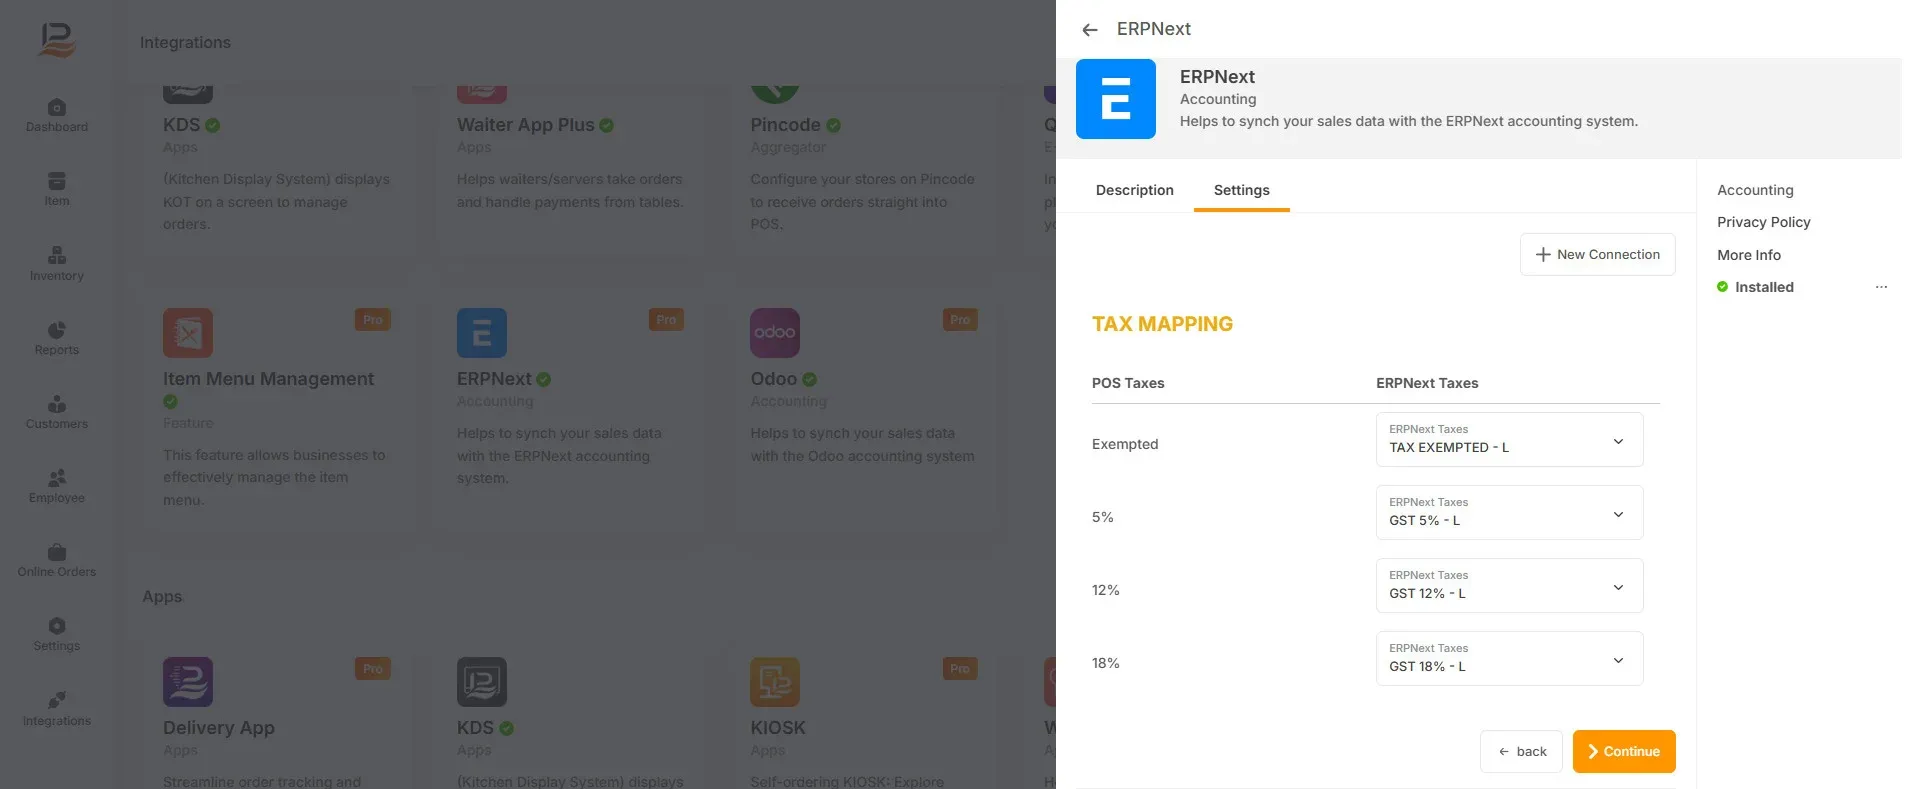
- Tax Mapping: Align tax structures between LithosPOS and ERPNext sales and purchase taxes. Then click Continue.
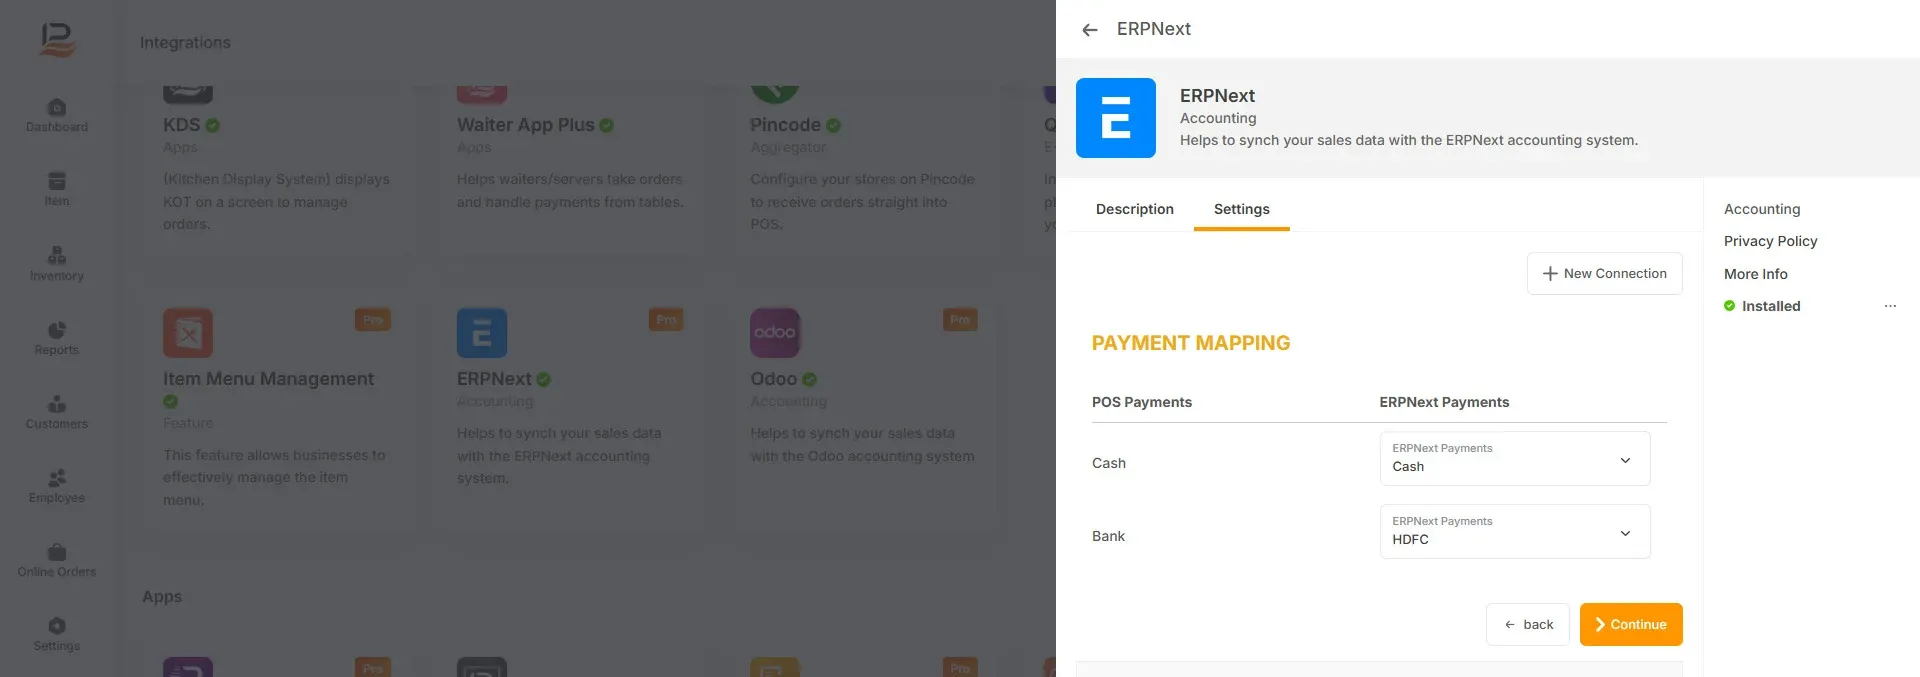
- Payment Mapping: Map POS payment methods (cash, card, wallet, etc.) with ERPNext.
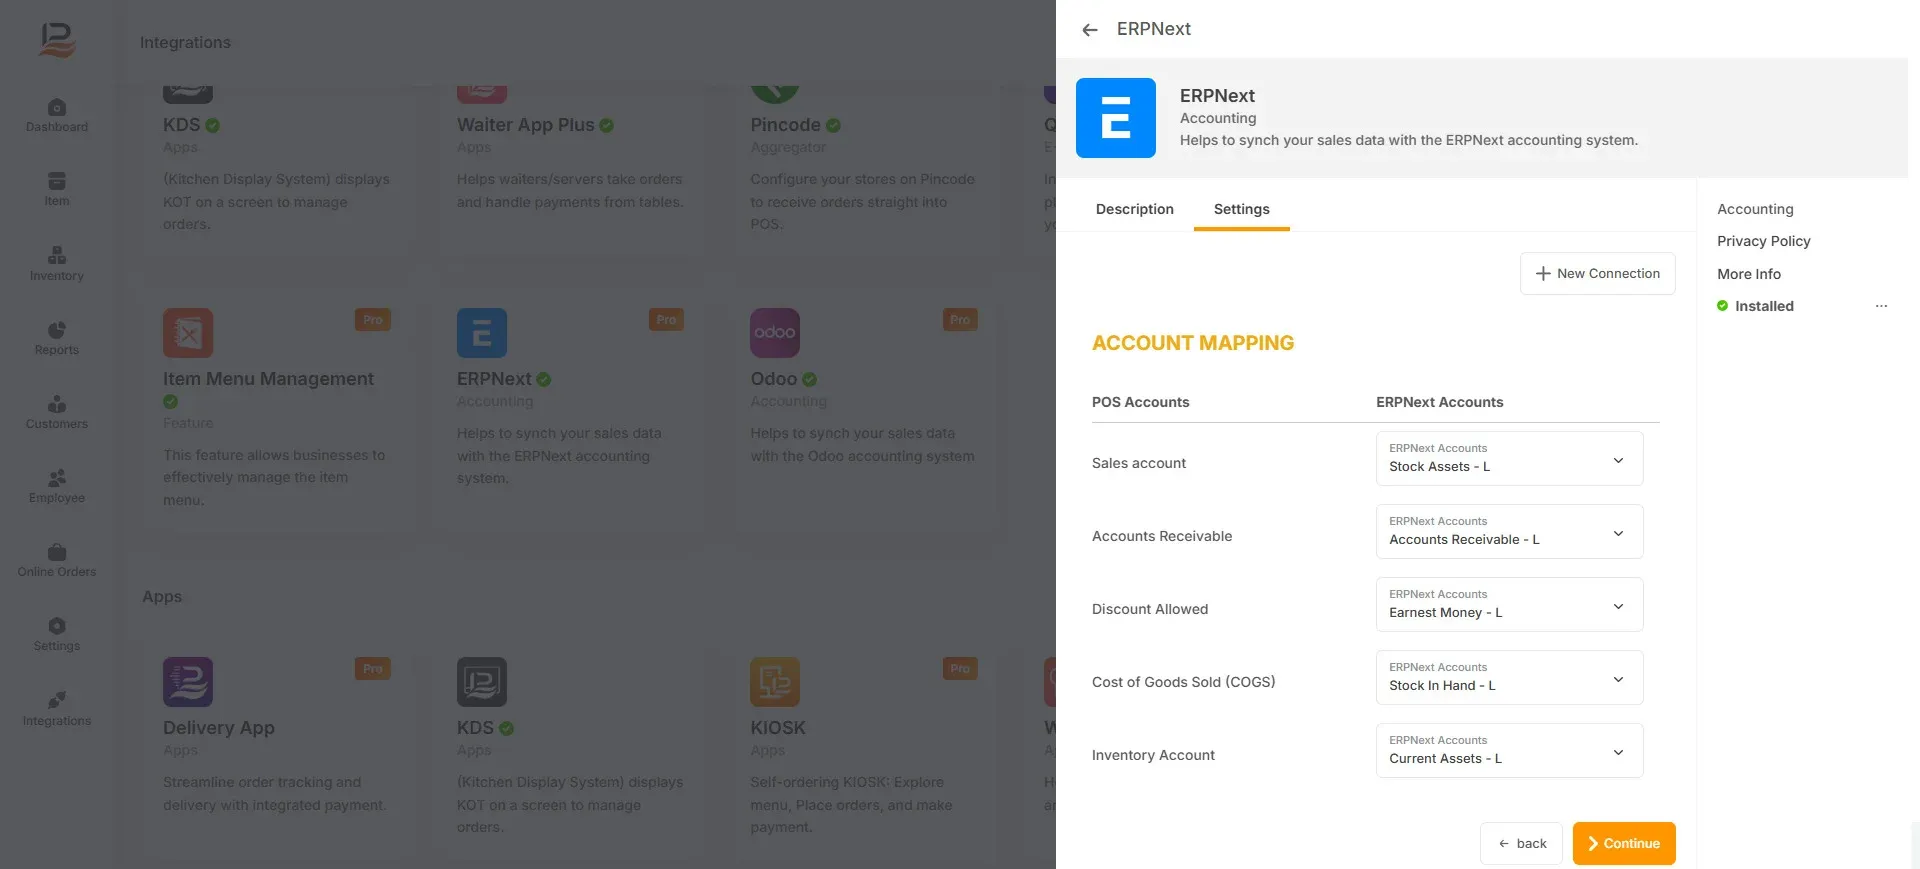
- Account Mapping: Sync POS accounts with ERPNext for accurate financial integration..
Synchronization Options
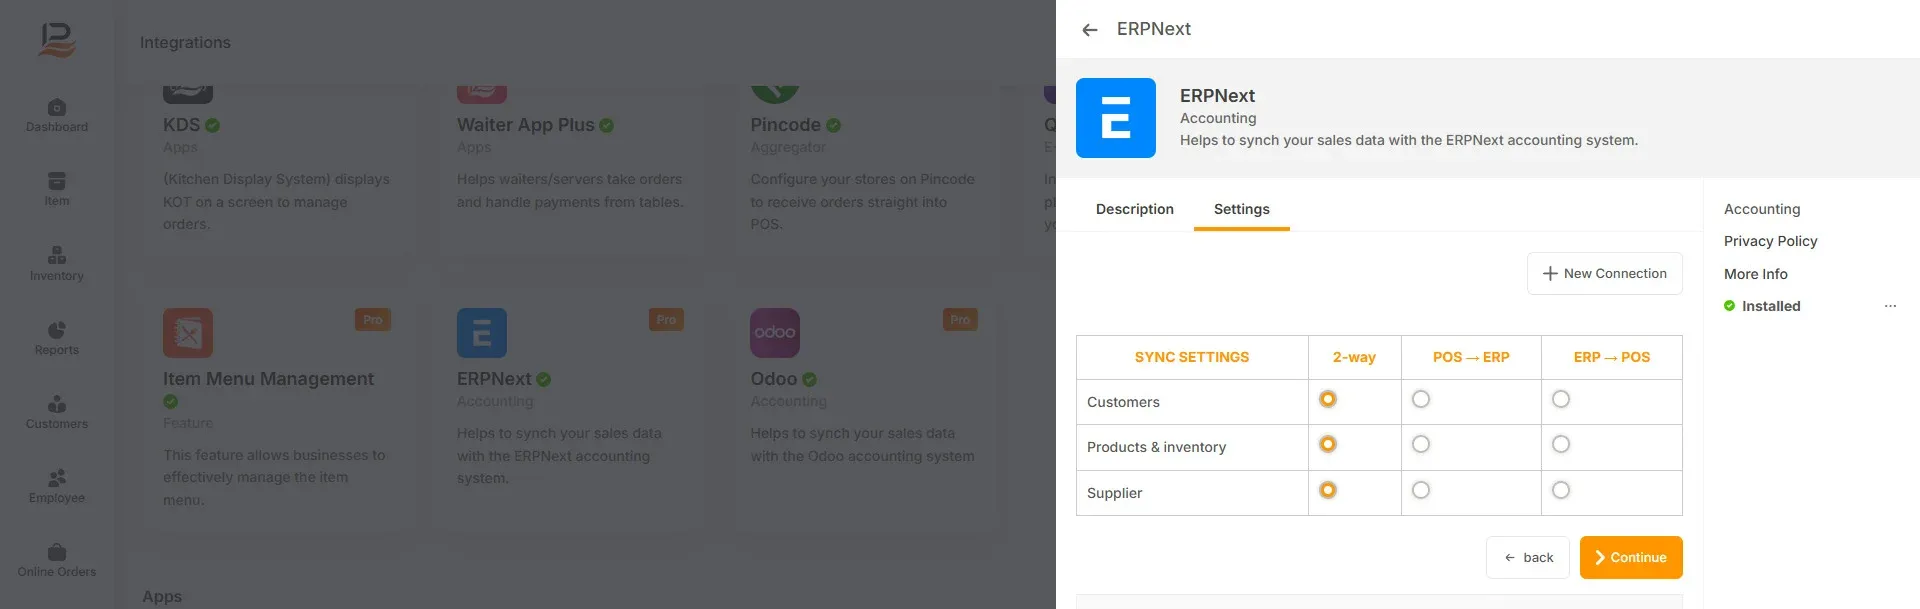
- This setting allows you to choose how the sync works — either two-way (POS ↔ ERPNext) or one-way (POS → ERPNext or ERPNext → POS)
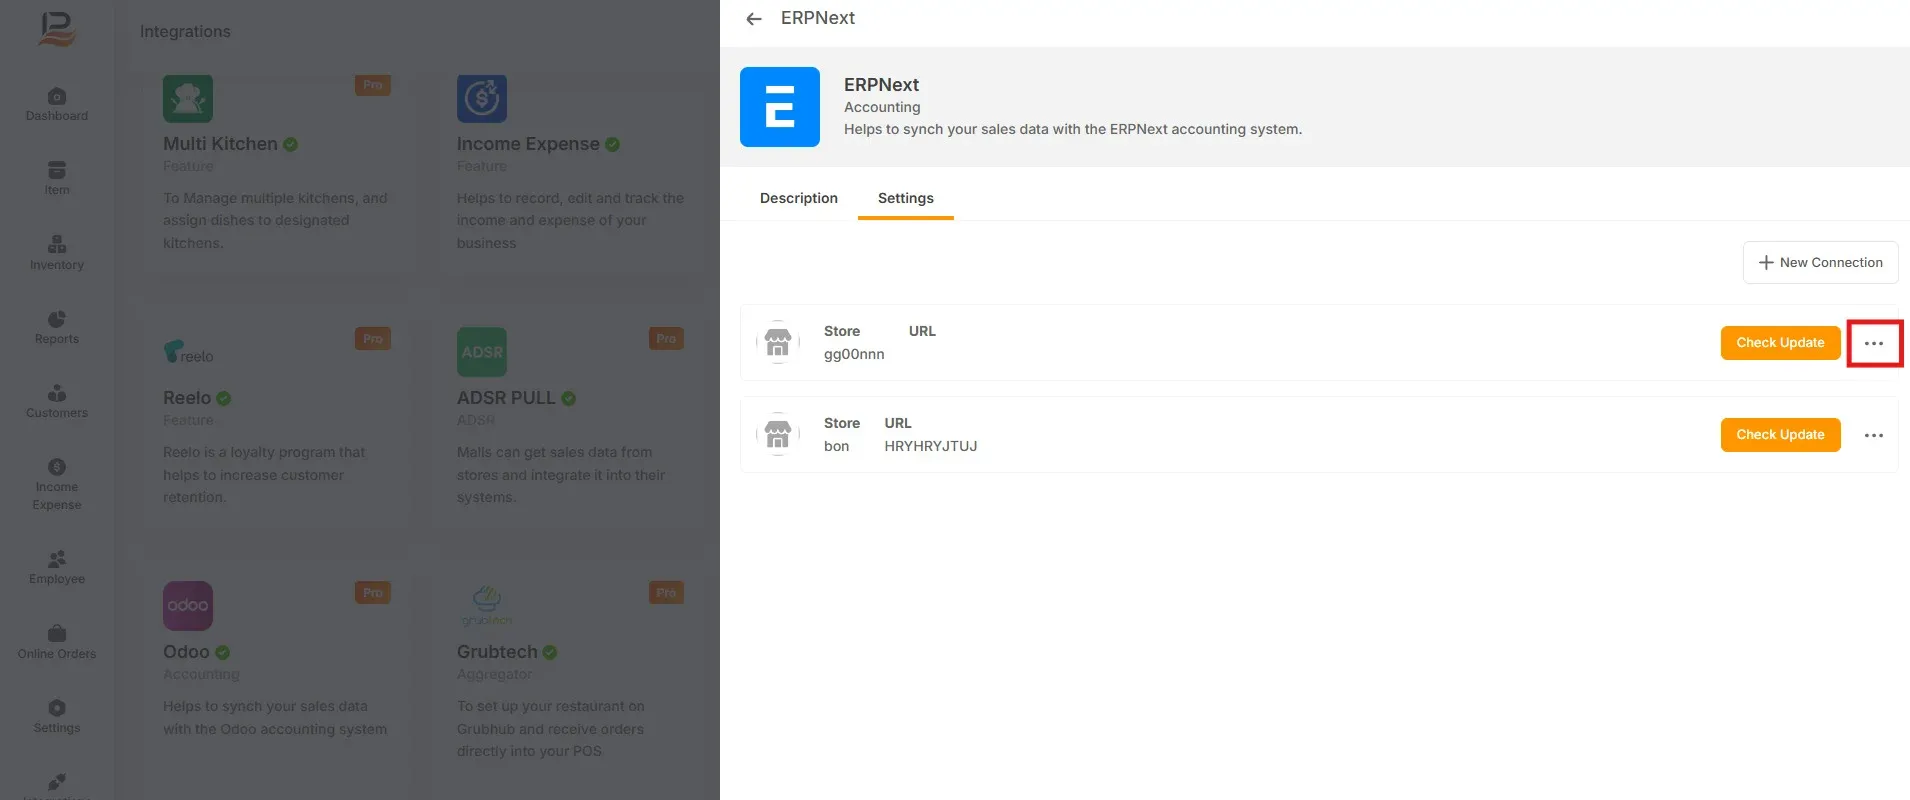
- The three-dot menu located on the right side includes the Sync option, which initiates the synchronization process when selected.
- Customer Sync: Share customer profiles and loyalty details with ERPNext’s CRM.
- Product & Inventory Sync: Update stock in ERPNext whenever sales or purchases happen in LithosPOS.
- Supplier Sync: Enable automatic pushing of supplier data from POS to ERPNext.
- 'Check Update' button is provided to facilitate the mapping process for newly created items such as tax, UOM, payment types etc.
Support & Troubleshooting
- Ensure you have the required ERPNext license and admin rights on your PC.
- Contact LithosPOS support for help with connector installation or data access issues.
Connect with us to know more
To learn more about it feel free to book a meeting with our team
Was this article helpful?