Settings
This is where you manage many essential business settings with ease.

General Settings
Start by clicking on ‘Settings’ on the side menu and navigating to general settings.
Fill in the following carefully.E-Mail : Your registered Email address will show up here.
Business Name : Give the name of your business.
Website : Enter your business website address here, if you have one
Opening Time : Enter your store opening time. The day sale cycle starts from this time
Timezone : ghgh Choose the exact time zone from the Drop-down list.
Tax Type : Select the Tax type of your business.
State : Enter your state.
Currency : Select the Currency type you use in your Business.
Now set up the toggle buttons:-
Tax Included : Activate this option to include tax in item prices.
Barcode Auto generation : Activate this to automatically generate product barcodes when adding new items
Rounding : This option allows you to Round off the bill amount.
- By activating this option, two columns will appear.
- On the 'Rounding to' Column, enter the amount to be rounded.
- Then fill in the Middle Point column.
- Then click submit to save the settings.
Example
If you set .50 as the Rounding to amount and .25 as the Middle Point, the bill amount of 10.36 will be rounded to 10.50 or if the bill amount is 10.20 it will be rounded to 10.00.
Features:-
Go to settings and click on features then configure the toggle buttons. This allows you to enable and disable different features based on your requirements.
Shifts:- Enabling this option helps you monitor your employees' shifts and track cash flow going in and out of your drawer during each shift.
Customer Loyalty:- Activate this option to enable loyalty settings. The loyalty program allows you to credit a percentage of the purchase amount into the customer's loyalty account.
Online sale:- Activate this to enable online sales. It facilitates the sale of your products through an integrated online ordering platform.
Weighing scale:- Enable this section only if you use a weighing scale.
Low Stock Notifications:- Get daily email on items that are lower than your reorder point.
Tip:- Activate this option for tipping the waiter or captain
EBT:- Activate this to enable Electronic Benefits Transfer eligible items
Markup Automation: If you activate this, the retail price of items will be automatically adjusted based on a preset markup percentage. This ensures a consistent margin and prevents underselling. If disabled, you will need to enter the retail price manually.
Item Second Language: This setting manages the text orientation of the second language. In LithosPOS, item names can be entered in two languages. By default, this setting is LTR (left to right). However, if you want to write the second name of items in Arabic, you can switch it to RTL (right to left).
Billing And Subscriptions
This is where you view and manage your subscription plans. You can upgrade your plan to access additional features. Stay informed about your current plan and its expiry date. Know the number of stores and terminals included in your subscription.
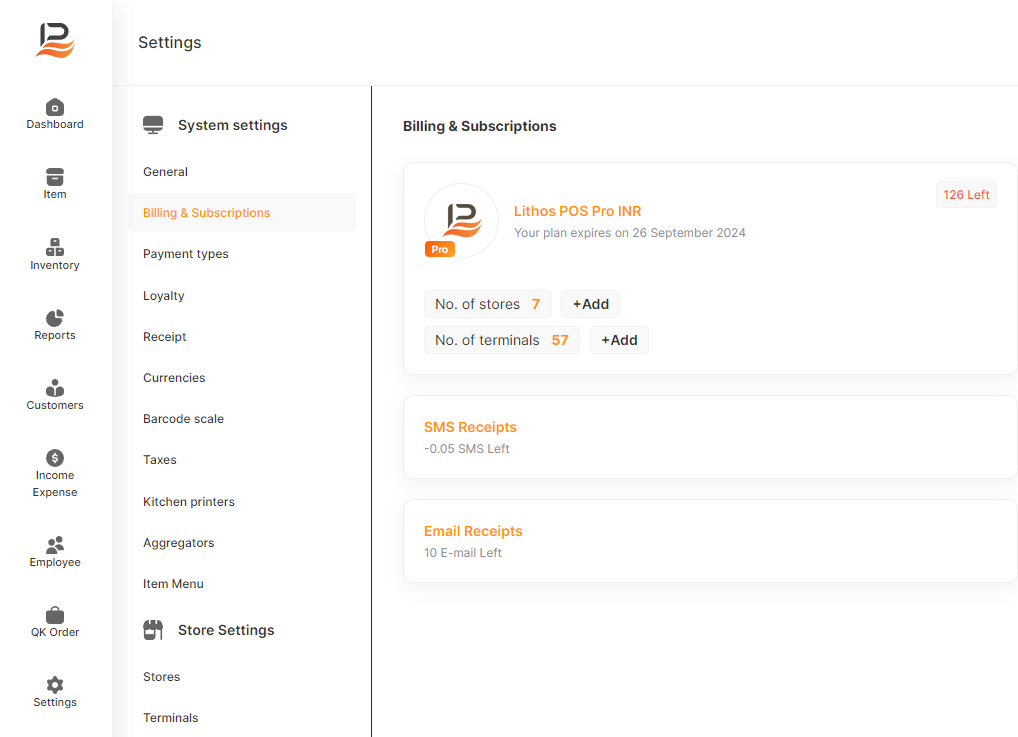
Adding Stores or Terminal:
You can add additional stores or terminals by
- clicking the ‘+Add’ near the ‘Number of stores’ or ‘Number of terminals’.
- Then enter the number of stores or terminals you want to add
- Click continue, then enter the name email, address, and GST number.
- Then click confirm to proceed to payment,
- Finally complete the payment.
SMS Receipts:.
Keep track of your SMS, and stay informed about the remaining SMS balance, You can add an additional SMS limit.
- Click on the Add SMS button.
- Enter the number of SMS click to proceed to payment
- Complete the payment.
Email Receipts:.
Keep track of your Email balance.
Payment Types
Here is where you can add and manage various payment types:
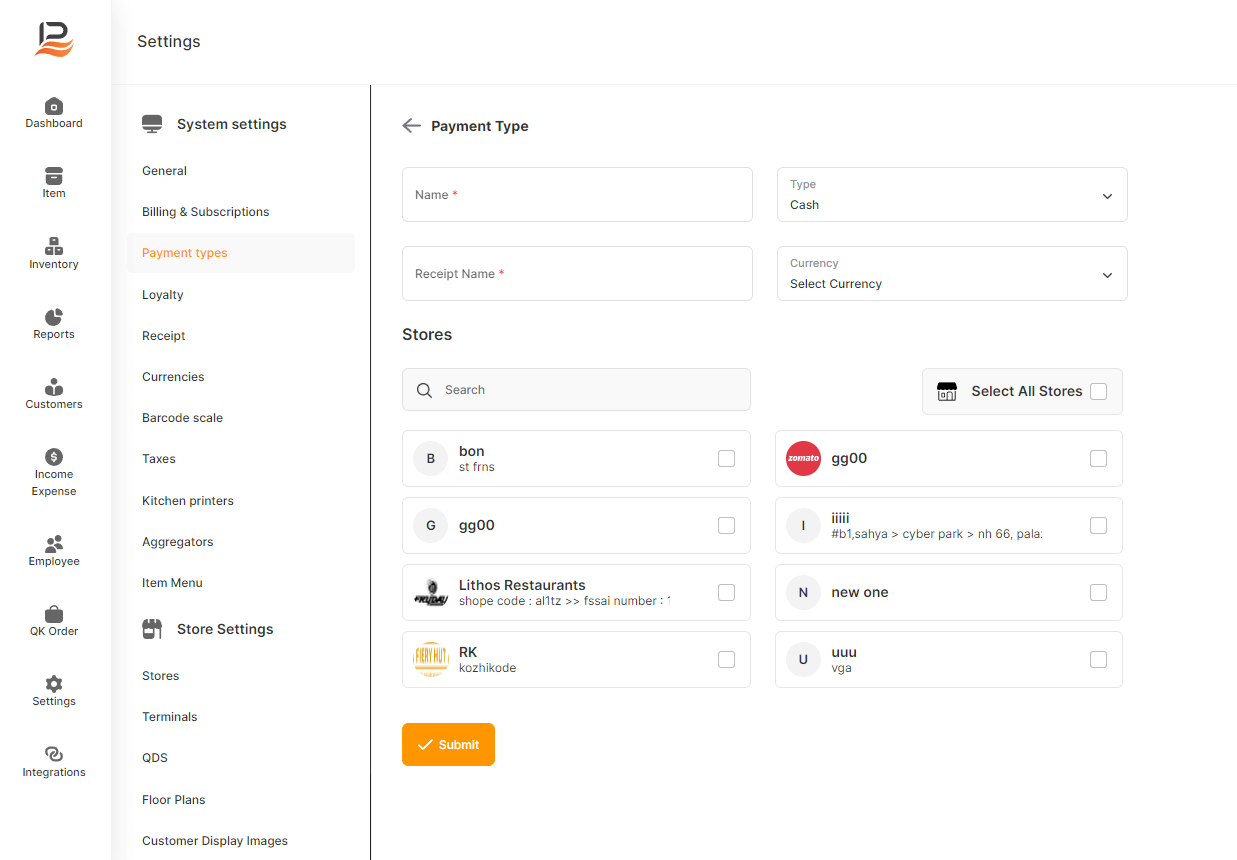
- Click on 'Settings' from the Side menu.
- Navigate to ‘Payment types’.
- Then click on the ‘+ Add Payment Type’ on the top right of the screen
- In the Name column, enter a payment name.
- From the drop-down list 'Type', select which type of payment you prefer - cash, card, or any other payment type.
- In the 'Receipt Name' field, specify how this payment type should be printed on the receipt
Note: If you have multiple stores, they will be listed under the section 'Stores'. You can select the stores where you want this payment type to be available by selecting the corresponding column. Finally, click Submit to save the payment type.
Loyalty
LithosPOS Loyalty helps to track customer data and enhance engagement, fostering repeat purchases and business growth
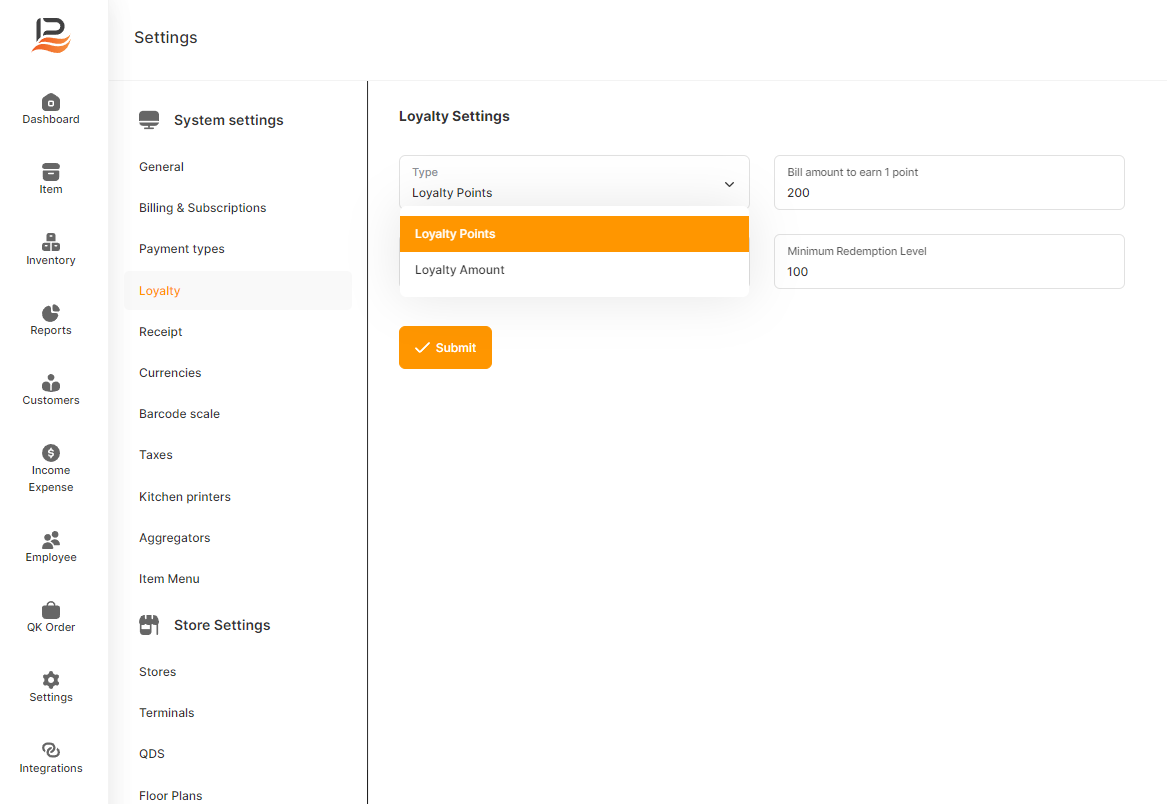
Loyalty Points:
Loyalty points are rewards customers earn based on their spending. For instance, customers might earn 1 point for each dollar spent. You can specify how much money equals 1 point and set a minimum points threshold to redeem the points as rewards
- Go to settings, and navigate to ‘loyalty’.
- In loyalty type the first column by default chooses loyalty point.
- Enter a bill amount to earn 1 point,
- In the ‘Point in Amount' column specify how much money equals 1 point.
- Then set a ‘Minimum Redemption Level’
- Finally click submit.
Loyalty Amount:
Loyalty amount represents rewards customers earn as a percentage of their purchase value. You can set a minimum redemption level.
- Go to settings, and navigate to ‘loyalty’.
- In loyalty type select loyalty amount.
- Enter a loyalty percentage [on every purchase, the specified percentage amount will be added to the customer's loyalty account]
- Then set a ‘Minimum Redemption Level’
- Finally click submit.
Receipt
Customize the receipt titles, footers, and logos:
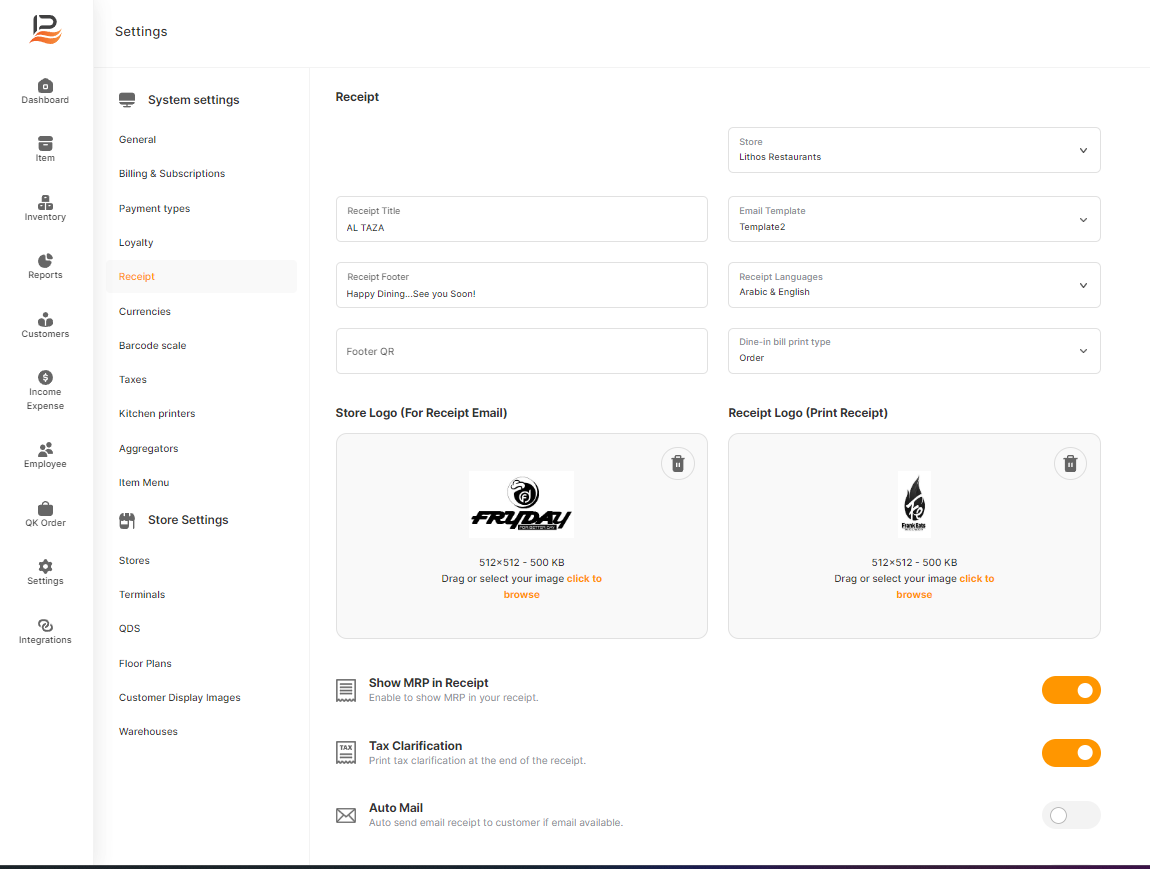
- Go to ‘Settings’ and then choose ‘Receipt’
- If you've added multiple stores, choose which stores this receipt applies to
- Enter a receipt title: The title given here will be printed on your Receipt and email. If you leave this column empty, the store name will be printed.
- Enter a Receipt Footer text: If you want to write in 2 lines enter a greater than '>' symbol between the sentences.
- Enter the Footer QR
- Next select the email template, we have two types of email template
- Then choose the preferred language
- Select the preferred Dine-in bill print type: Bill or Order.
Note: If you choose 'Bill' here, the final bill will be generated upon printing the bill, and changes can't be made thereafter. However, if you select 'Order' here, it will print the order as a bill, allowing you to make changes to the order and reprint it as needed. - Upload the store logo. The maximum size allowed is 512x512 pixels, and the file size should not exceed 500KB. This logo will be displayed on the email receipt.
- Then upload the receipt logo with the same file size as the store logo (512x512, maximum 500KB). This logo will appear on the receipt. Use black and white images for a clear image view.
- Now configure the Toggle buttons:-
- Finally click submit to finish.
Show MRP in Receipt:Enable this to show MRP in receipts
Note: This button may only be visible if MRP regulations are applicable in your region.
Tax Clarification:Enable this to print tax clarification at the end of receipt.
Auto Email: Activate this option to send the receipt via email to customers if their email is available in the customer data
Auto SMS:Activate this option to send the receipt via SMS to customers if their Mobile number is available in the customer data
Print Invoice Number As Barcode:Activate this to print the invoice as a barcode.
Currencies
LithosPOS offers a multi-currency currency option for seamless transaction management. Remember, this feature is unavailable in the Lite plan.

- Go to settings in the side menu and navigate to Currencies.
- Click on ‘+Add Currency’.
- Select the desired currency from the ‘Currency Search’.
- Then select the currency code.
- Then fill in the exchange rate.
- Finally click ‘Submit’.
Barcode Scale
LithosPOS is compatible with different types of scales including weighing scales that suit your needs.
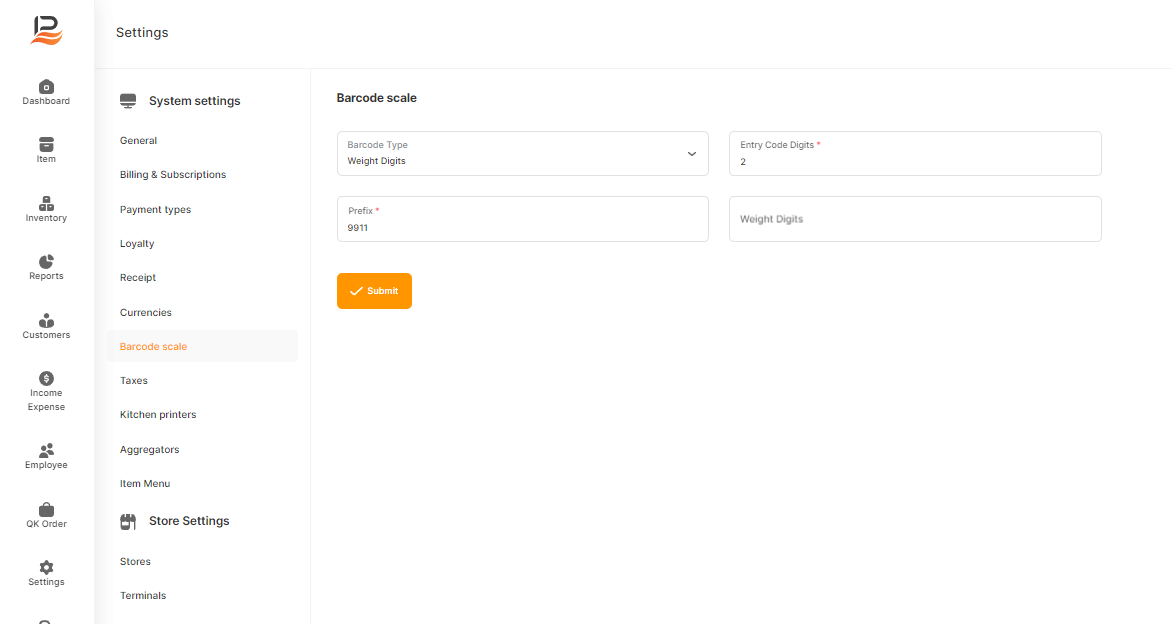
- Select the Barcode Type, [Weight/Rate]
- Go to settings in the side menu and navigate to ‘Barcode Scale’
- Enter a prefix, [9911 is the default prefix in LithosPOS].
- Please enter the number of digits for the Item PLU Code
- If you have selected the ‘Barcode Type’ Weight, then enter the ‘Weight Digit’ define the number of digits to represent the weight information.
- If you have selected the ‘Barcode Type’ Rate, then enter ‘Rate Digit’ and set the fractional digit of currency.
- Finally, enter the submit.
Taxes
LithosPOS allows you to manage different types of taxes
- Go back office and navigate to Settings in the side menu, then go to ‘Taxes’
- Click on the Add Tax button on the top right.
- A popup window will be displayed on the right side of the screen
- Enter a tax name.
- Then input the tax percentage [Enter the digit without the % icon]
- Finally, click submit
Note:- To assign a tax to a specific Item navigate to ‘Item’ in the side menu and click on ‘Items’ From the item list select the item you desire and open it. click on the taxes, select the Tax you desire, and save the item.
Kitchen Printers
This module allows you to set up multiple “Kitchen Printers’ and assign specific categories of items to each kitchen for printing KOTs. For example, if you have separate kitchens for appetizers and desserts. With this module, you can assign the 'Appetizers' category to Kitchen 1, and 'Desserts' to Kitchen 3. So, when an order for appetizers comes in, it's printed on the KOT in Kitchen1 and the desserts KOT is printed in kitchen2. .

- Go to settings in the side menu and click on Kitchen Printers
- Click Add kitchen printer
- Enter a kitchen name
- Choose the item categories that you want to be printed on the KOT from this printer.
- Finally submit save.
Please note the following:-
1- The Multiple kitchen printer option is only available in LithosPOS Pro.
2- After configuring this you can link these “kitchen Printers” to your printers in the POS printer settings.
Aggregators
Efficiently manage online orders and deliveries with LithosPos by integrating settings for top delivery aggregators.
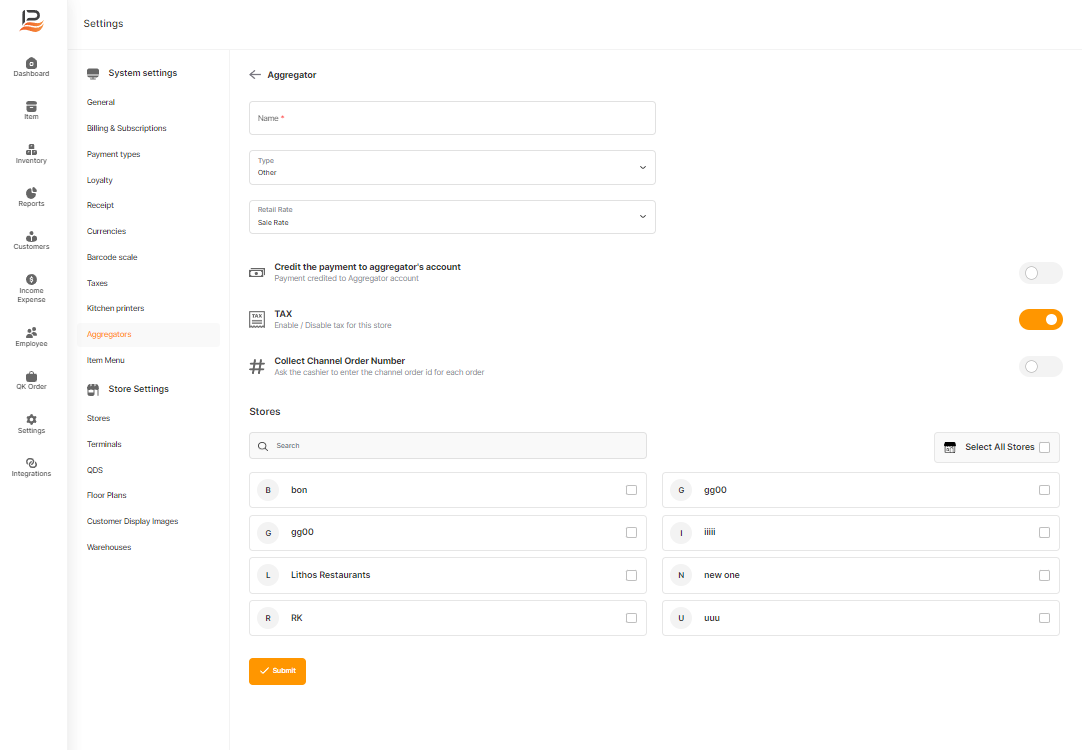
- Go to Back office settings and click on Aggregators.
- Click on the ‘+Add Aggregator' button, and a popup will open
- Enter the aggregator name, followed by choose the aggregator from the List
- Then select the rate.
Note:- This feature will be activated in the future. Based on this, you will be able to manage three types of prices for an item in LithosPOS. You can set which price you want to assign to this aggregator.
Then configure the toggle buttons:-
- Enable the first button to credit the payment to the aggregator account.
- Activate the Tax button to enable tax.
- If you enable the” Collect channel order number” the system will ask the cashier to enter the channel order ID for each order. This will ensure accurate tracking and matching of orders with their corresponding transactions on the aggregator's platform, streamlining reconciliation processes
- Toggle the ‘Activate button to activate or deactivate this aggregator in the store.
- If you have multiple stores assign those stores to these aggregators by selecting the stores from the following lists of stores.
- Finally, click submit.
Item Menu
Item Menu is a versatile module designed to streamline item management in your store. It offers the following options:
- You can perform bulk activation or deactivation of items in stores and online platforms. This eliminates the need to open each item individually to change rates or activate/deactivate them
- To set three different sales rates for items, you can tailor pricing strategies to suit various scenarios.
- Menu Item simplifies the process of copying items between stores.
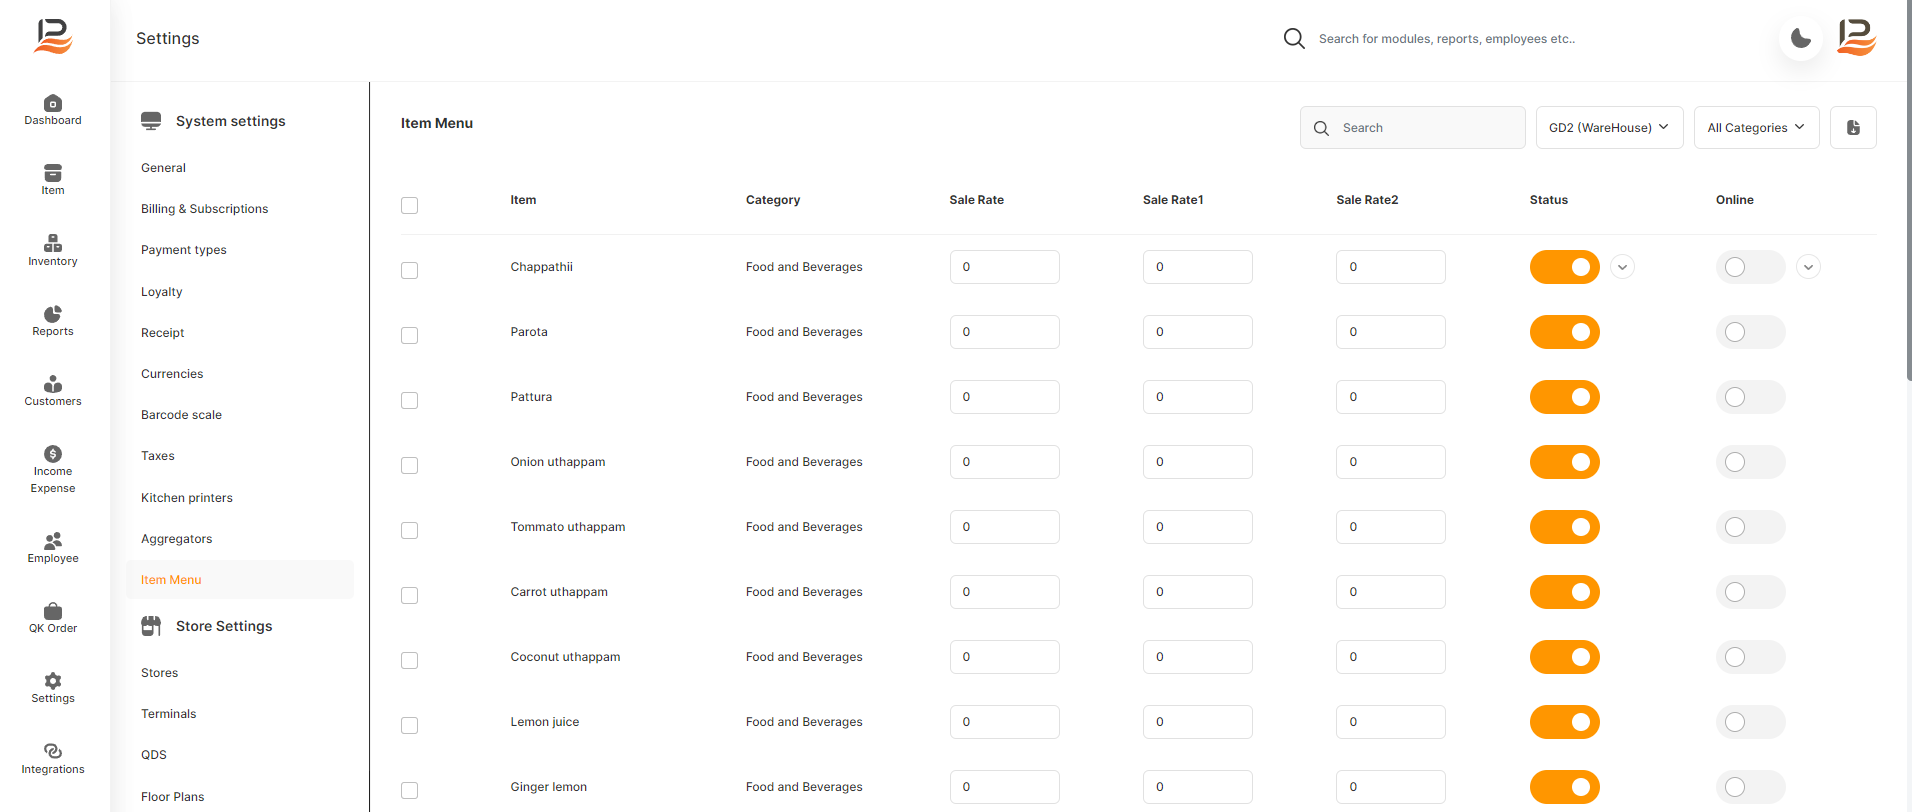
Let’s configure the Item Menu:
- Go to back office settings and click on Item Menu
- All items in your inventory will be listed here. You can sort the items alphabetically or in reverse order by clicking the arrow mark
- You can search for a particular item from the search column
- Select the store to view the store-specific item list
- Select the category to filter items by the desired categories..
- If you want to select all the items, check the checkbox in the header.
- Once you select the item click on the Actions tab. There are 3 actions you can do.
1- Copy Sale Rate to Sale Rate 1: Copy the sales rates to sales rate 1
2-Copy Sale Rate 1 to Sale Rate 2: Copy the Sale rate 1 to sale rate 2
3-Copy To Store: Copy the selected item to any of your stores. - To activate items in stores, turn on the toggle button below the “Status’. To activate all items at once, click the down arrow near the first toggle button. Similarly, turn it off to deactivate.
- To activate items in online stores, turn on the toggle button below the ‘Online’. To activate all items at once, click the down arrow near the first toggle button, all the items will be activated in the online store in one click.
