
Menu Import (AI)
Upload photos or a PDF of your menu and Lio, the LithosPOS AI assistant, turns it into items, variants, modifier groups, combos and meals. You review everything Lio found before anything is added to your catalogue.
With the menu import, you do not have to type your menu in item by item. Take photos of your printed menu, or upload the PDF, and Lio reads every page. Lio finds the items, prices, sizes, add-ons, combos and meals, and shows them to you for review. When everything looks right, you create all the items in one go.
Menu import is a separate flow from the CSV and Excel item import: there is no template to fill in.
The import takes five steps:
Upload → Reading → Review → Create → Done
Before you start
- Files: JPG, PNG, WebP, HEIC or PDF, up to 40 MB each.
- Pages: up to 5 pages per import. If your menu is longer, run one import for each part of it.
- Photo quality: take each page straight on, in good light, with the whole page in the photo. Text cut off at the edge, glare or a blurred photo makes prices harder to read.
- Cost: your first 5 imports are free, and each one can have up to 5 pages. After that, reading a menu uses AI credits for each page Lio reads. Creating the items never uses credits.
Open the menu import
- Log in to the Back Office and go to Items in the side menu.
- Click Import from menu, next to the Import button at the top right. The number of free imports you have left is shown below the button.

You can also open it from Items > Menu import (AI) in the side menu.
Step 1: Upload your menu
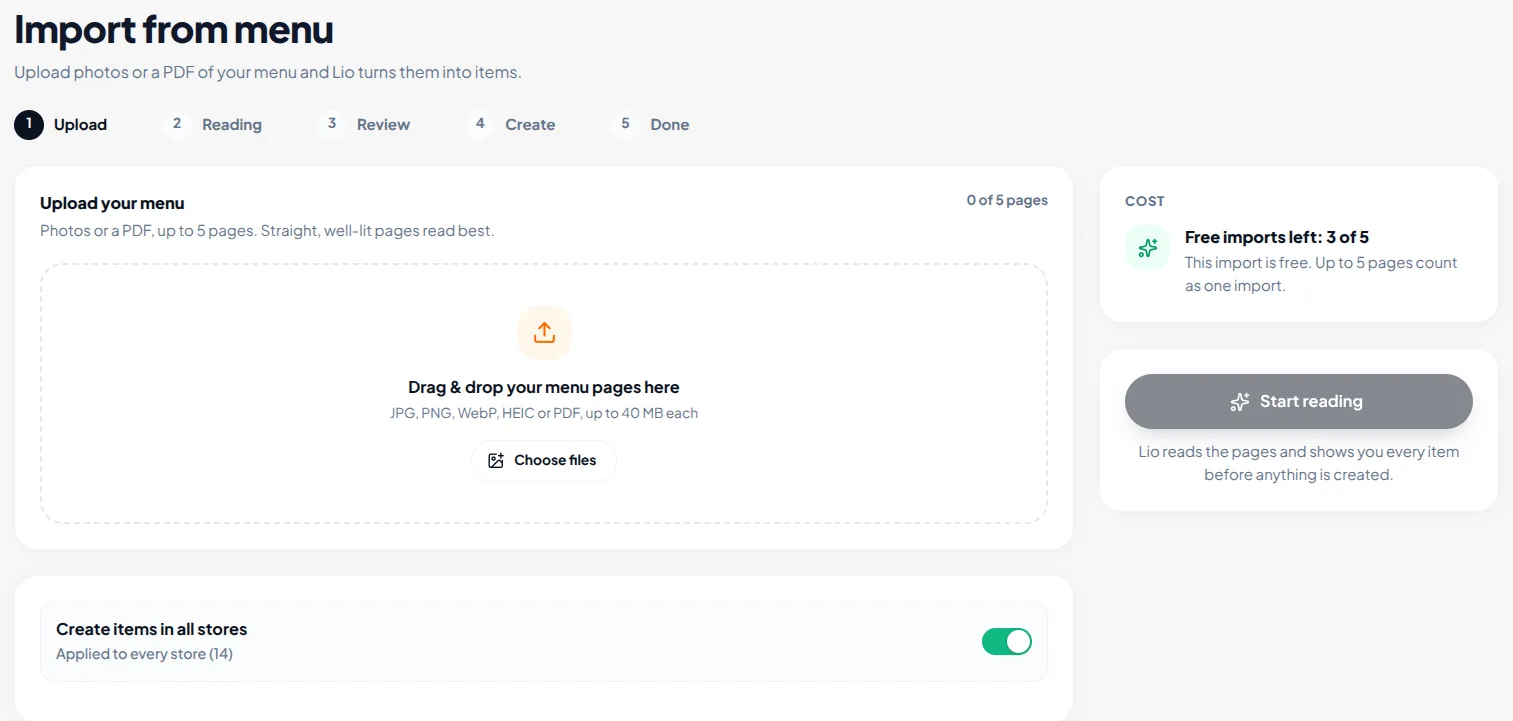
- Drag your menu pages into the upload box, or click Choose files. On a phone, you can tap Take a photo to use the camera.
- If you upload a PDF with more pages than the import can take, choose the pages you want, then click Use selected.
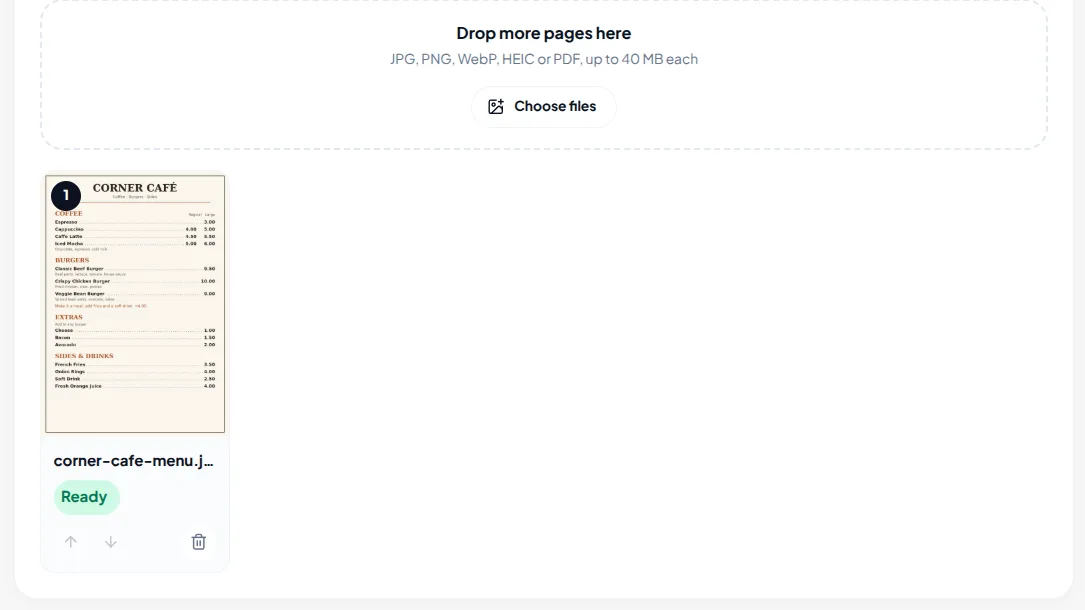
- Check the page order. Use the arrows on each page to move it up or down, or remove a page you do not need.
- If you have more than one store, choose the stores to add the items to, or keep Create items in all stores.
- Check the Cost panel. It shows whether this import is free, or how many credits it is likely to use and your current balance. If your balance is too low, click Top up.
- Click Start reading.
Step 2: Lio reads your menu
Lio reads your pages one by one and shows each page's progress: Waiting, Straightening, Reading, Checking and Done. The Found so far panel counts the sections, items, modifier groups, combos and meals as Lio finds them, and how many items need your attention.
Reading can take a few minutes. You do not have to wait on the page. Close it and carry on with your work; the import keeps going. To come back to it, open Items: the Menu imports in progress card lists your imports with their status. Click Resume on the one you want.
- Paused: out of AI credits: reading stops when your credits run out. The pages already read are kept. Click Top up credits, then Resume to read the rest.
- Cancel import: stops reading. Nothing is created, and you are only charged for the pages already read.
Step 3: Review what Lio found
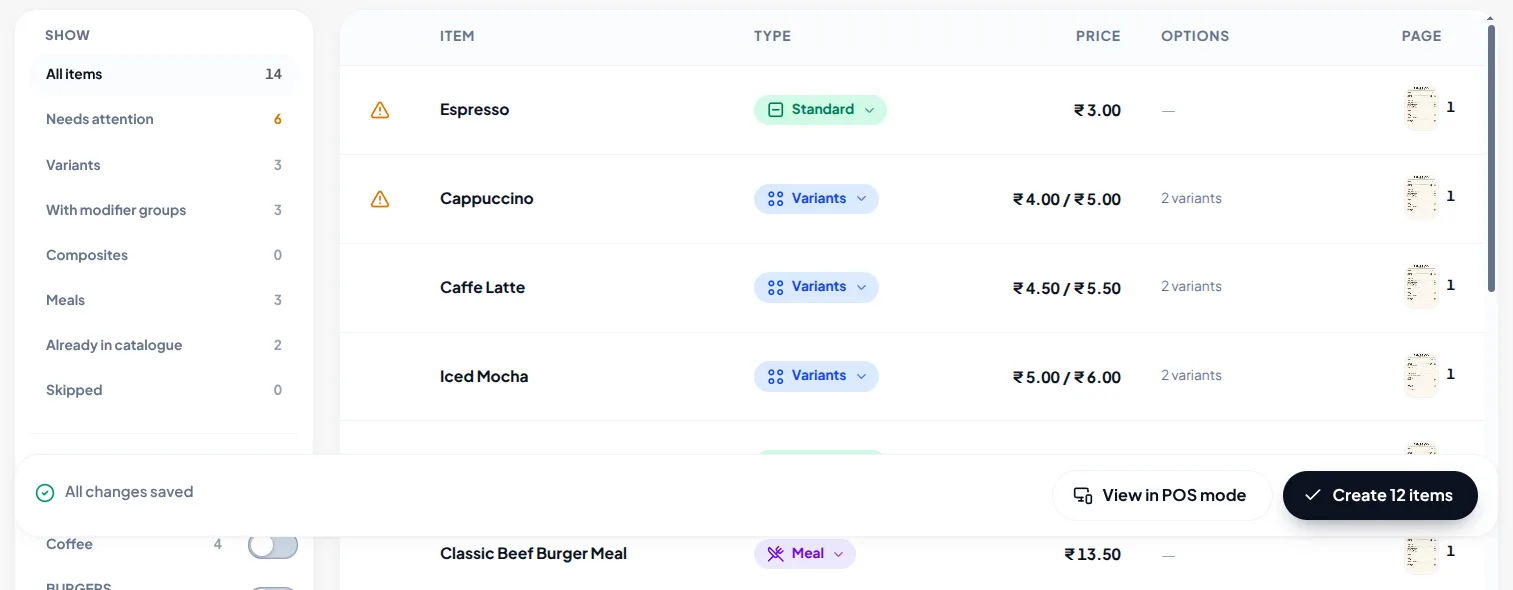
When reading is done, Lio shows every item it found in a table, with its type, price, options and the page it came from. Use this step to check and correct the items before they are created.
Check the items that need attention
Click Needs attention to see only the items Lio is not sure about. The Things to check column says why, for example:
- Price unclear or No price printed
- Market price: the price is entered at the till
- Cut off at the edge of the photo or From a page that was hard to read
- Lio was not sure about this item. Check it against the menu.
- Already in your catalogue as an existing item
Click the page number of an item to open that menu page next to it. Zoom in to compare the item with the printed menu.
You can also filter the table by Variants, Composites, Meals, With modifier groups, Already in catalogue or Skipped, and by category on the left.
Correct an item
Click an item to open its details. You can change its name, second-language name, description, category, menu number, tax, unit, price, variants, modifier groups, combo components, meal choices and dietary tags, and turn on Track stock or Price at the till for it.
If the item is already in your catalogue, its details show the matching catalogue item. Choose Skip, Update price or Add anyway for this item only, or click Not the same item if Lio matched it to the wrong one.
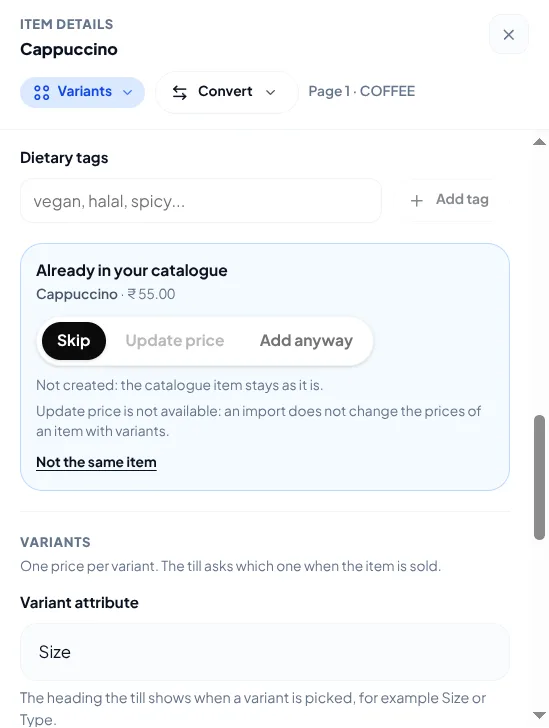
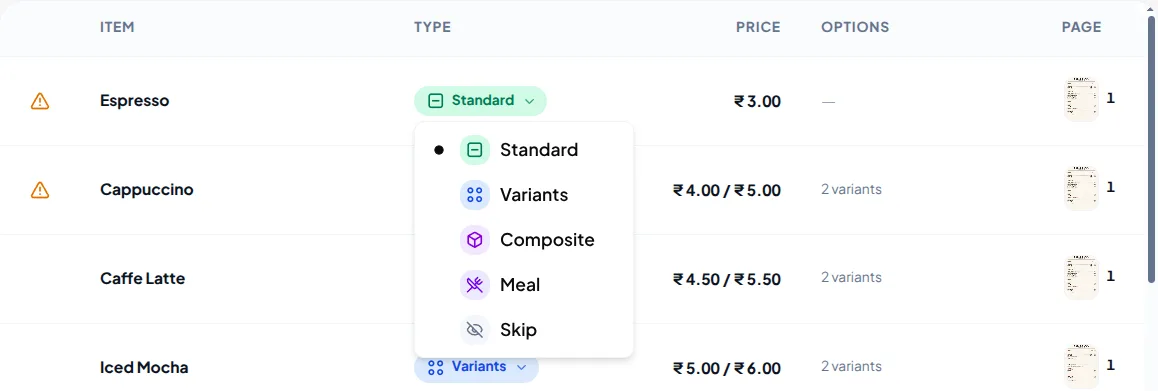
To change what kind of item it is, use the Type column:
- Standard: a single item with one price.
- Variants: an item with sizes or other options that each have their own price.
- Composite: a combo made of other items.
- Meal: a meal with choices the till asks for in steps (needs the Meal Combo feature).
- Skip: the line is not created.
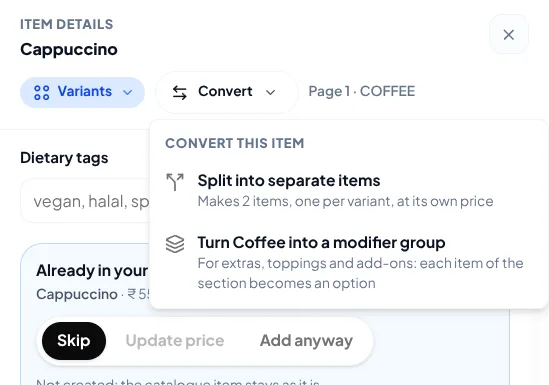
The Convert menu on an item handles the common corrections, such as turning a section of extras and toppings into a modifier group, making a set of variants a modifier group (or the other way round), or splitting a line into separate items.
Set the import options
The options above the table apply to the whole import:
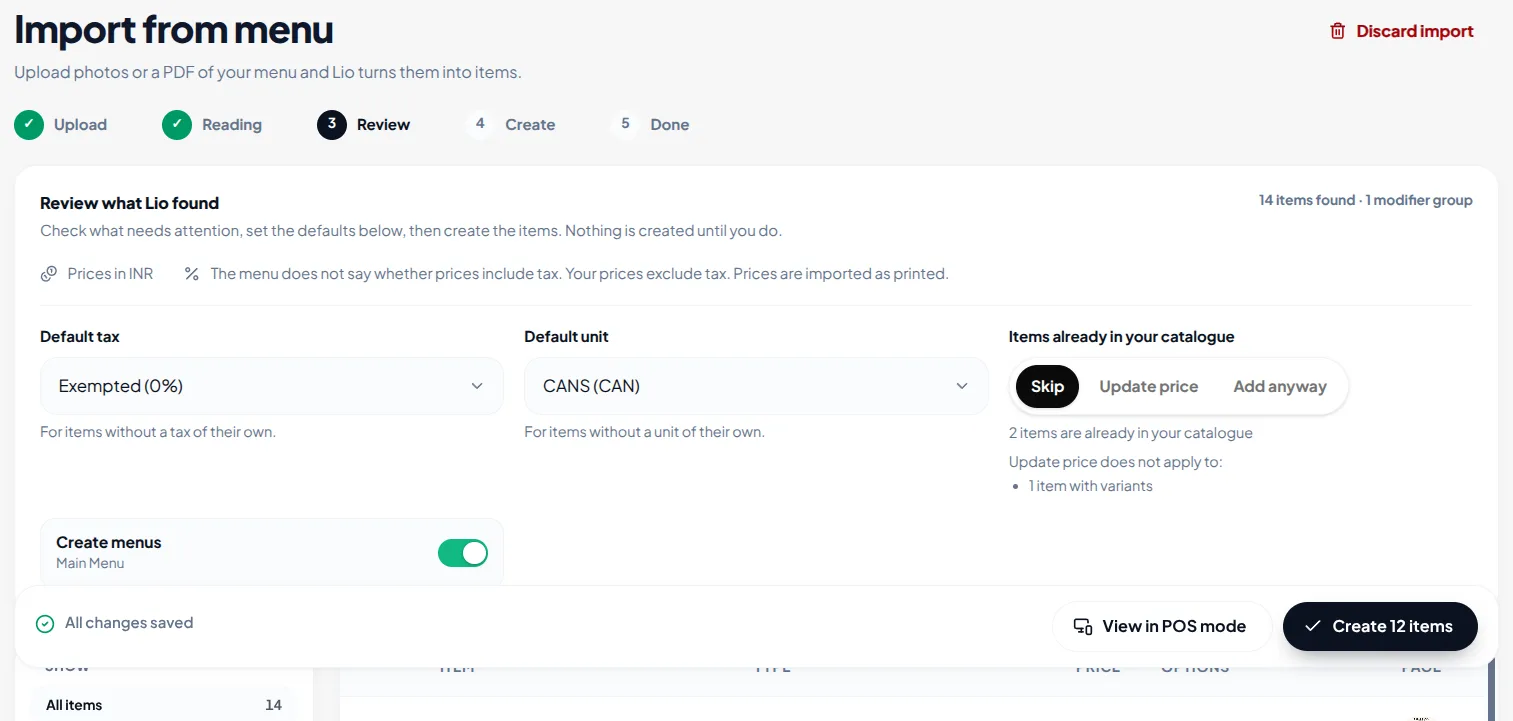
- Default tax: the tax for items without a tax of their own. You must choose one before you can create the items.
- Default unit: the unit for items without a unit of their own.
- Use menu numbers as SKU: uses the item numbers printed on the menu as SKUs.
- Create menus: creates a menu for each separate menu Lio found on the pages, such as Breakfast and Dinner.
- Items already in your catalogue: choose Skip, Update price or Add anyway.
- Track stock: turn stock tracking on for a whole category from the category list.
Your changes are saved automatically. You can leave the review and come back to it later from the Menu imports in progress card.
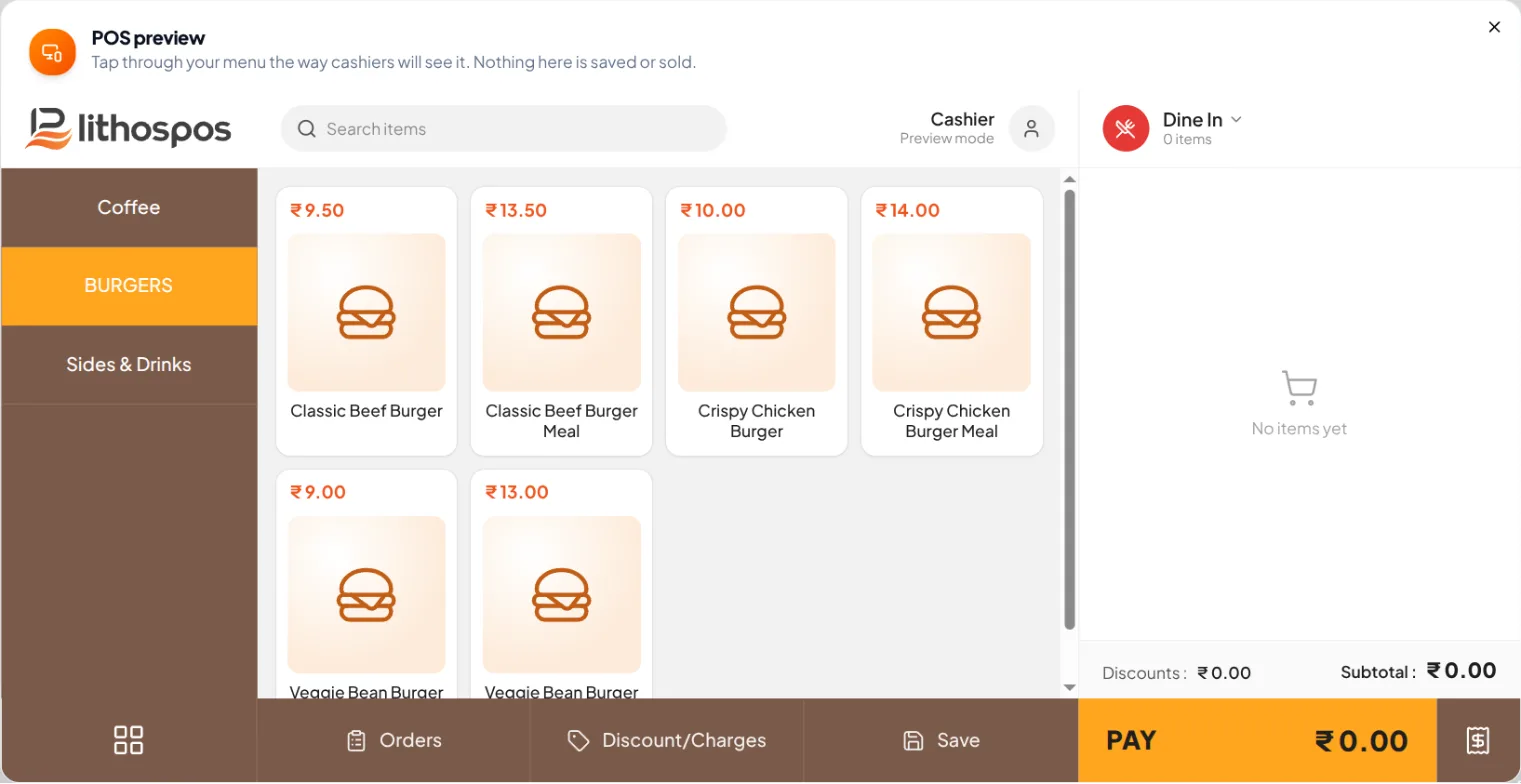
To see how your menu will look at the till, click View in POS mode. You can tap through the categories and items the way a cashier will. Nothing in the preview is saved or sold.
Step 4: Create the items
- At the bottom of the review, click Create. The button shows how many items will be created. If it asks you to fix issues first, correct the items marked with a problem.
- Check the summary: how many standard items, variant items, combos, meals, modifier groups, new categories and menus will be created, the stores, the default tax and unit, and what happens to items already in your catalogue.
- Click Create again to confirm.
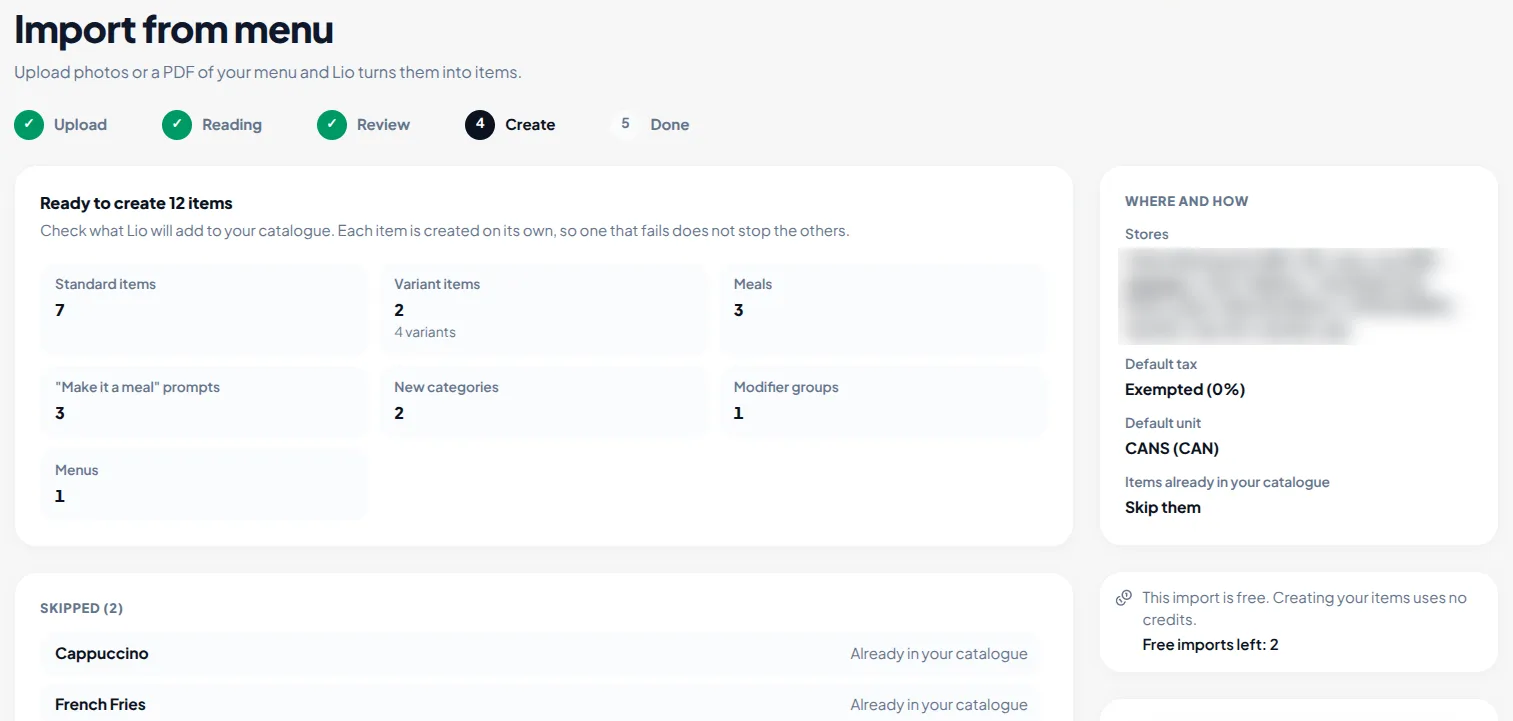
Lio creates the items one at a time. If one item fails, the others are still created. You can close the page while this runs.
Step 5: Check the results
When creation is done, the results page shows how many entries were created, updated, skipped and failed, and lists them in four tabs:
- Created: new items, categories, modifier groups and menus. An entry marked Reused already existed (for example a category with the same name) and was used instead of creating a new one.
- Updated: existing items whose price was updated.
- Skipped: items you skipped in the review, or items already in your catalogue.
- Failed: items that could not be created, with the reason.
Click any item to open it and adjust it like any other item. You can also click View in POS mode, Go to Items, or Start another import.
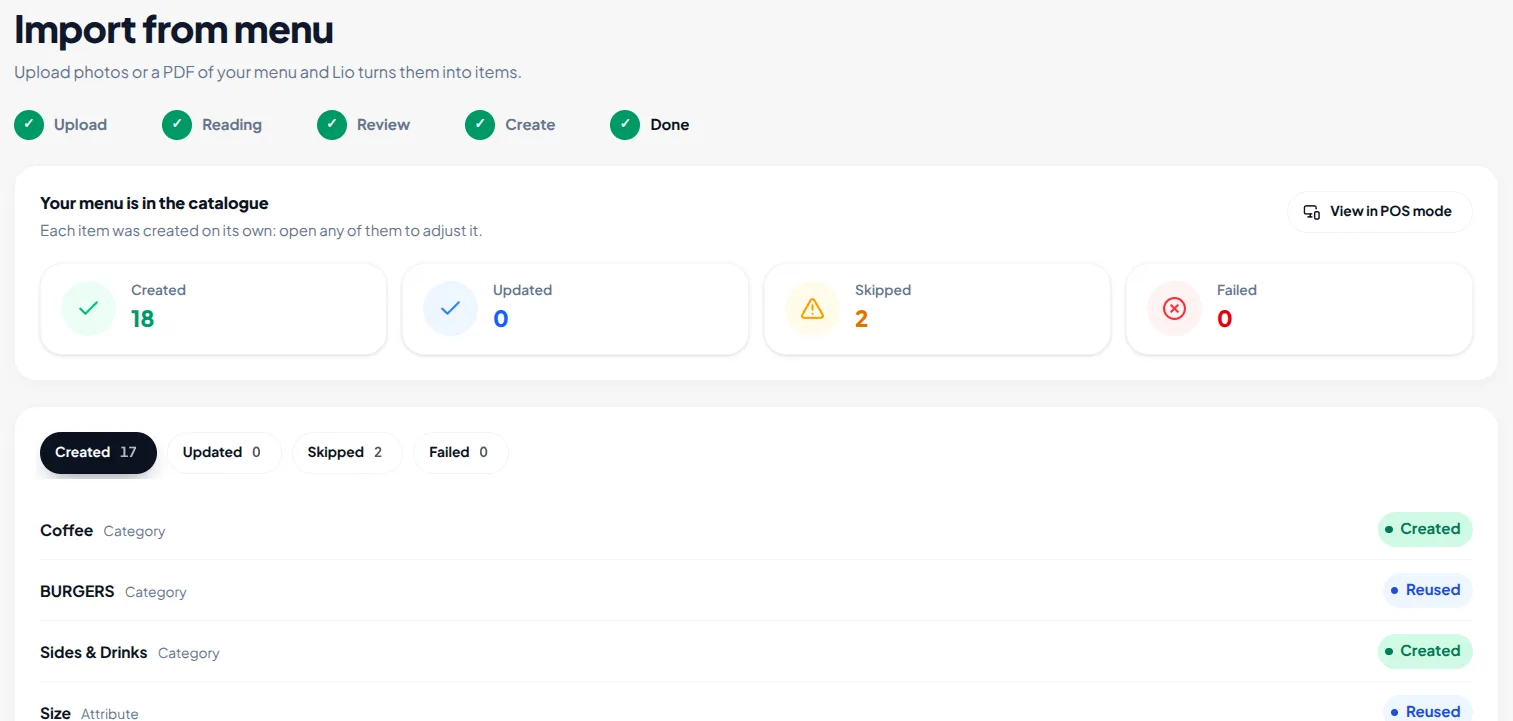
If creation stopped part way, what was created is kept. Click Retry creation to create the rest; nothing is created twice.
Updating prices of existing items
When you choose Update price for items already in your catalogue, the import changes the price of the matching items. It does not change the price of:
- combos and meals,
- items with variants,
- lines with no price on the menu,
- any item, when the import covers only some of your stores. Choose all stores in step 1 to update prices.
Discard an import
To delete an import you no longer need, click Discard import at the top right of the import. Its pages, what Lio read and your review are deleted. Your catalogue is not changed, and items that were already created stay.
- Credits already used to read the menu are not refunded.
- A free import that was discarded before it reached the review is given back. Once its pages were read and reviewed, it still counts as one of your free imports.
An import cannot be discarded while its items are being created.
Tips for the best results
- Photograph one page at a time, flat and straight on, in good light.
- Make sure prices and item names are not cut off at the edges.
- Upload the pages in menu order, so sections stay together.
- Review every item under Needs attention before creating.
- Set the Default tax and Default unit before you create the items.
Connect with us to know more
To learn more about it feel free to book a meeting with our team
Was this article helpful?