Adding Items in LithosPOS
Items are products or services you sell that make up your Item library. You can manually create items to sell from your business. And you can also import items in bulk using a CSV file template.
Before you can sell items from the POS, you need to add them in the back office first. LithosPOS offers robust item management capabilities, allowing you to handle three distinct types of items:
1. Standard Item
A typical item with no variants.
2. Variant Item
Items that come in different variants, such as size, color, or type, giving you the flexibility to manage multiple versions of a single product.
3. Composite Item
A combination of various items sold together as a single unit at a different price. Composite items do not
have their own inventory count. Instead, when a composite item is sold, the inventory of the individual
items included in the combo is automatically adjusted.
You can add items individually or upload them in bulk using a template file. Manage items across different
categories and units of measurement (UoMs). You can also add images to make them easily recognizable on the
POS screen and in online stores.
Explore the item settings in LithosPOS to optimize your inventory management and streamline your sales process
Standard Item
Adding Standard Item
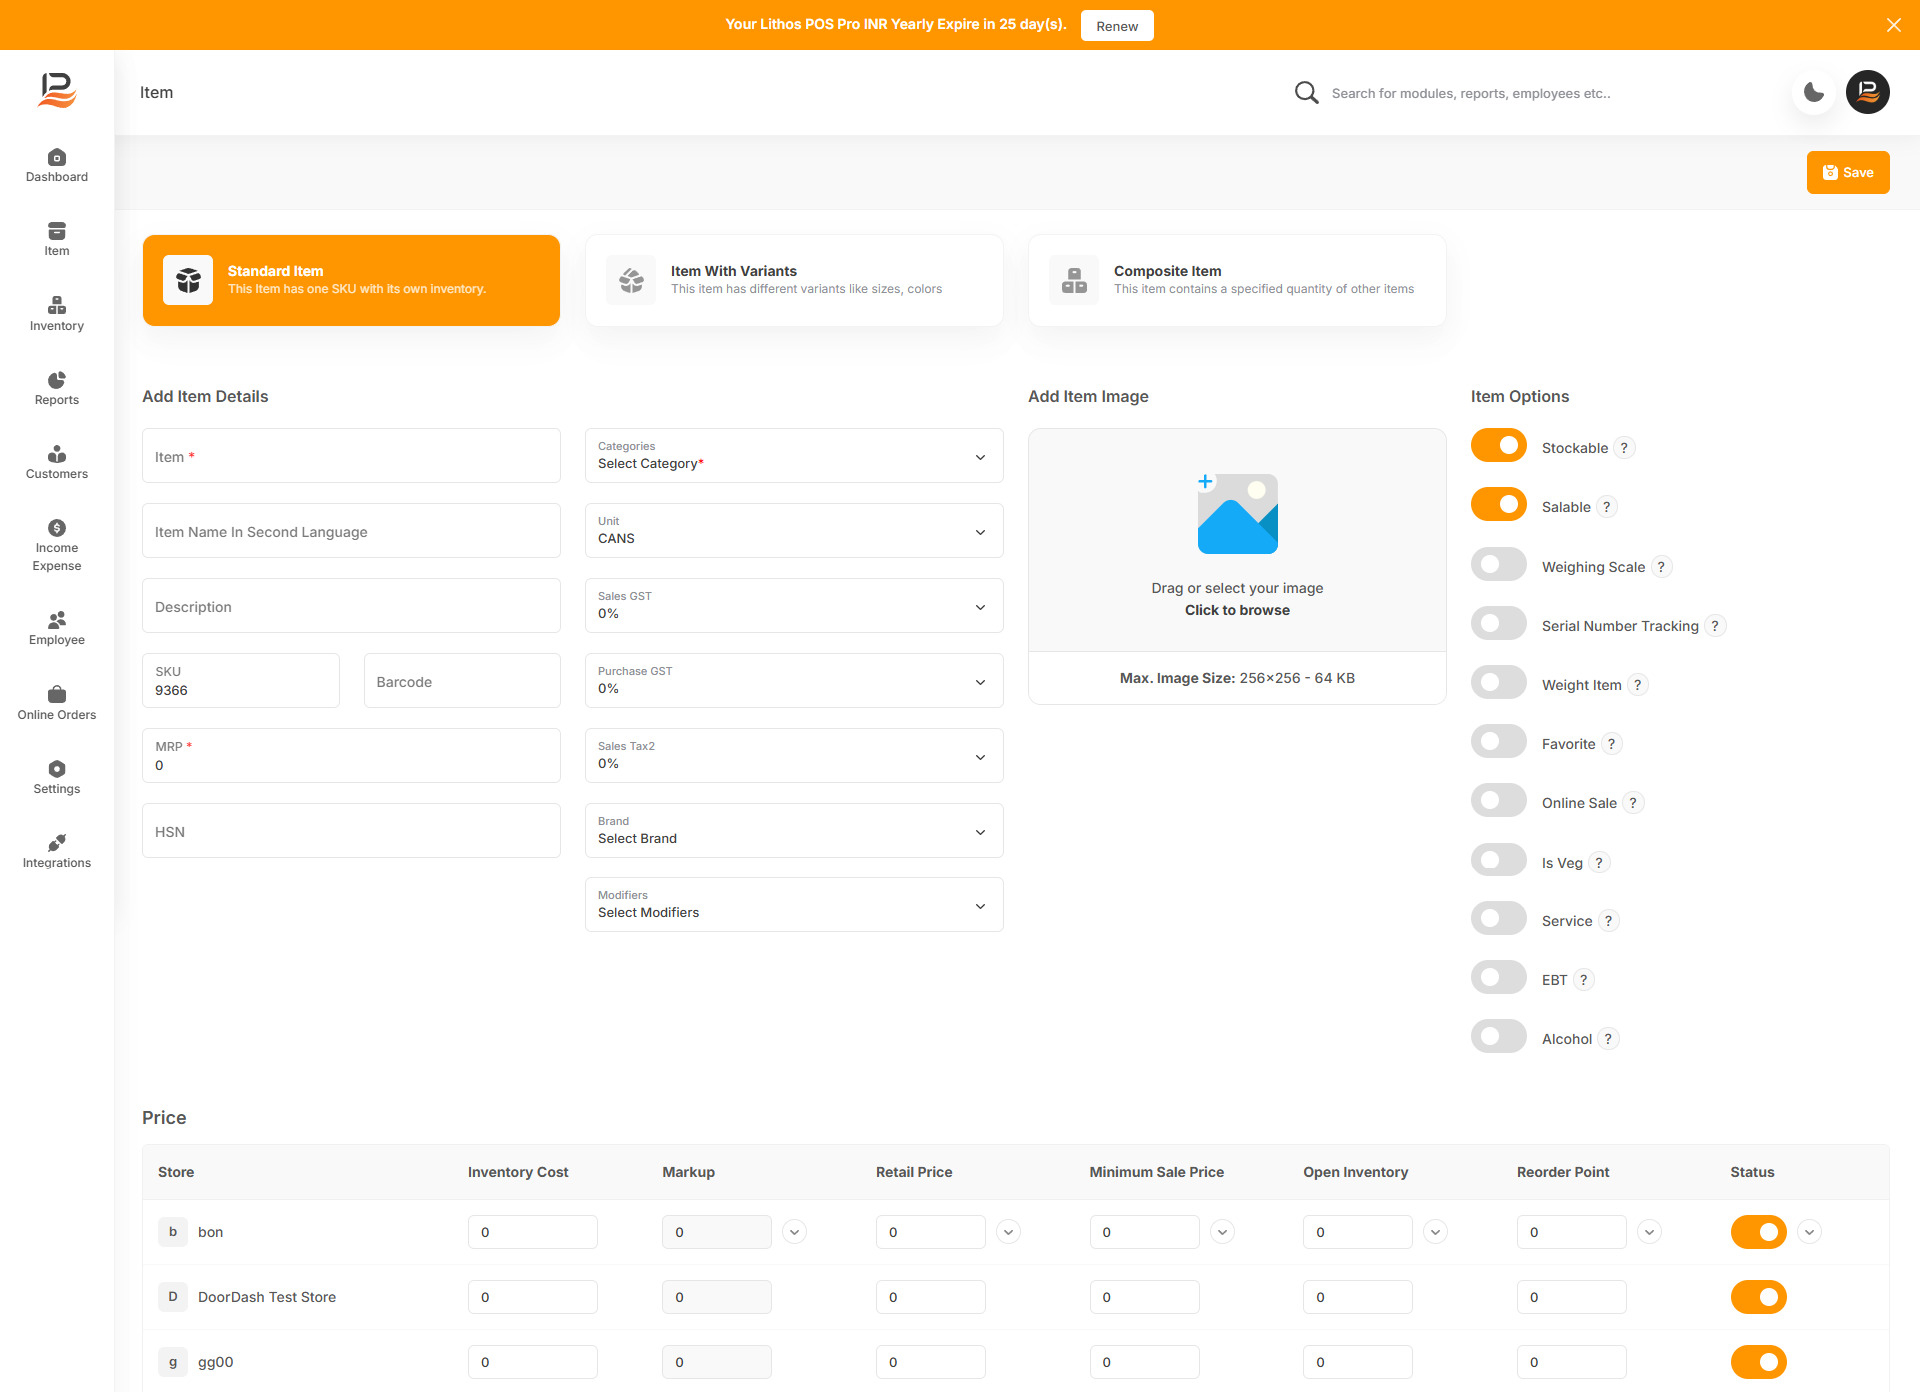
Standard items are normal items with no variants. This can be either added manually or uploaded in bulk using a CSV file template.
Let’s Take a Look at adding a Standard item
-
Login to the back office and click on the ‘Item’ in the side menu.
-
Click the ‘Add Items’ button in the top right corner. The standard item-adding page will open.
-
Item
Enter an item name in the item column. -
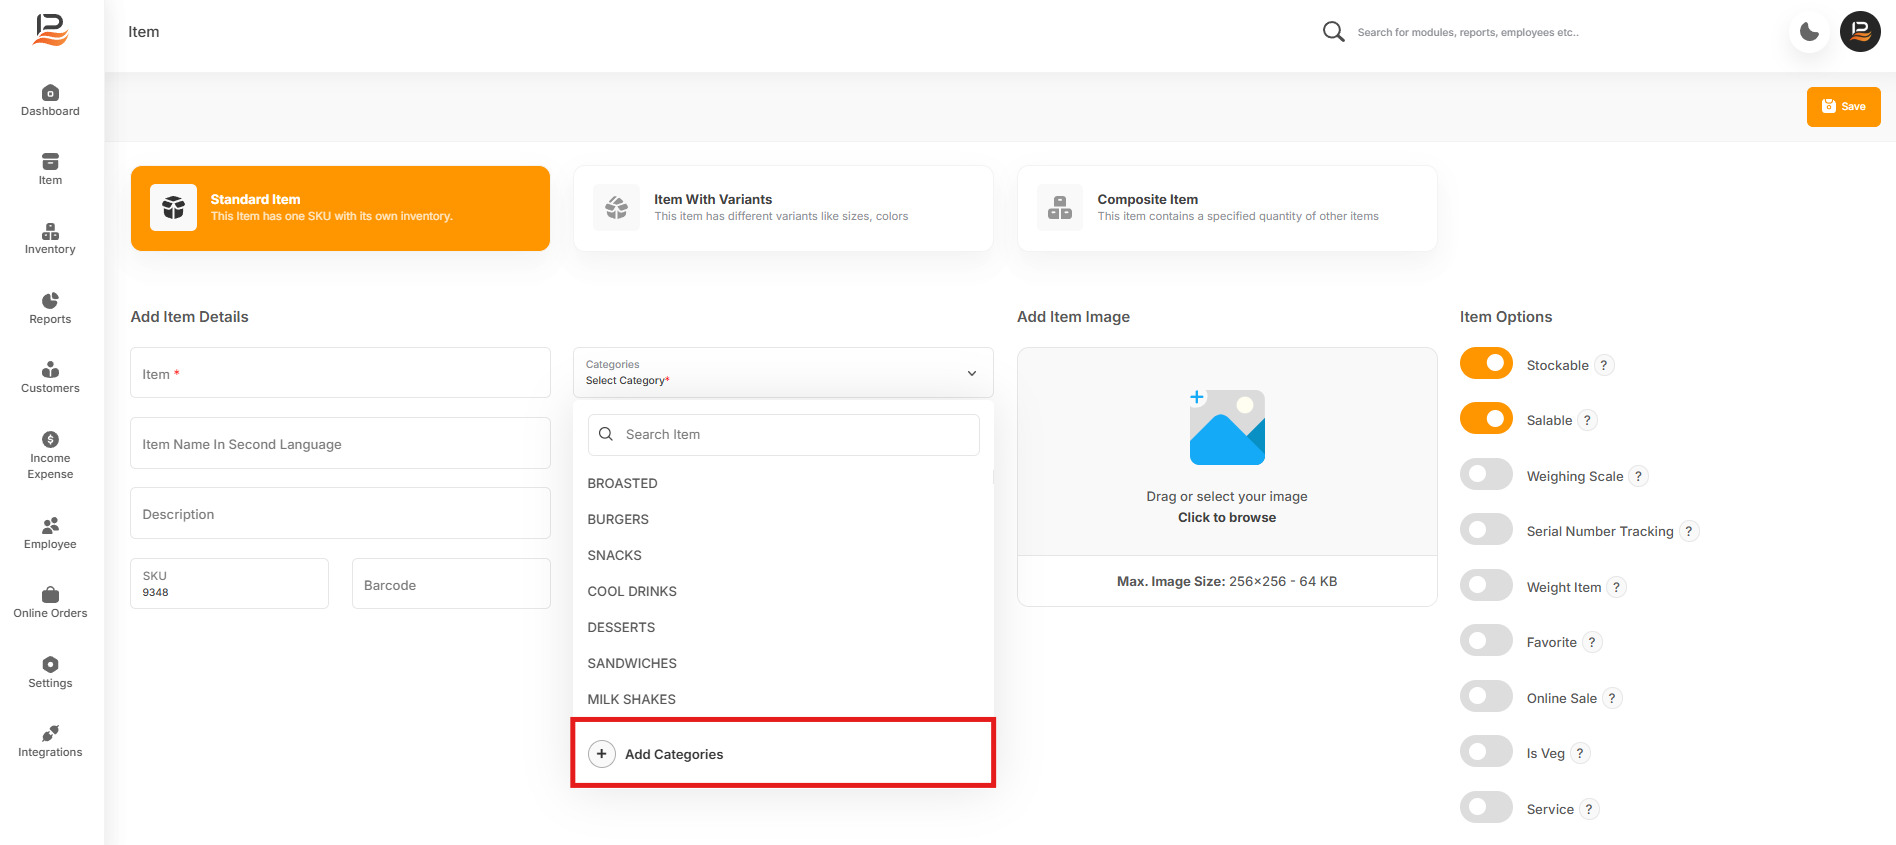
Category
Then, select a category from our current list of categories Or add a new one if necessary.
These categories will make it easier to identify and organize items in the POS and item library.Note:
To add a new category, click on the ‘Select category’, then click the ‘+Add Category’, then enter a category name, upload a picture if it's required, and click Save.
-
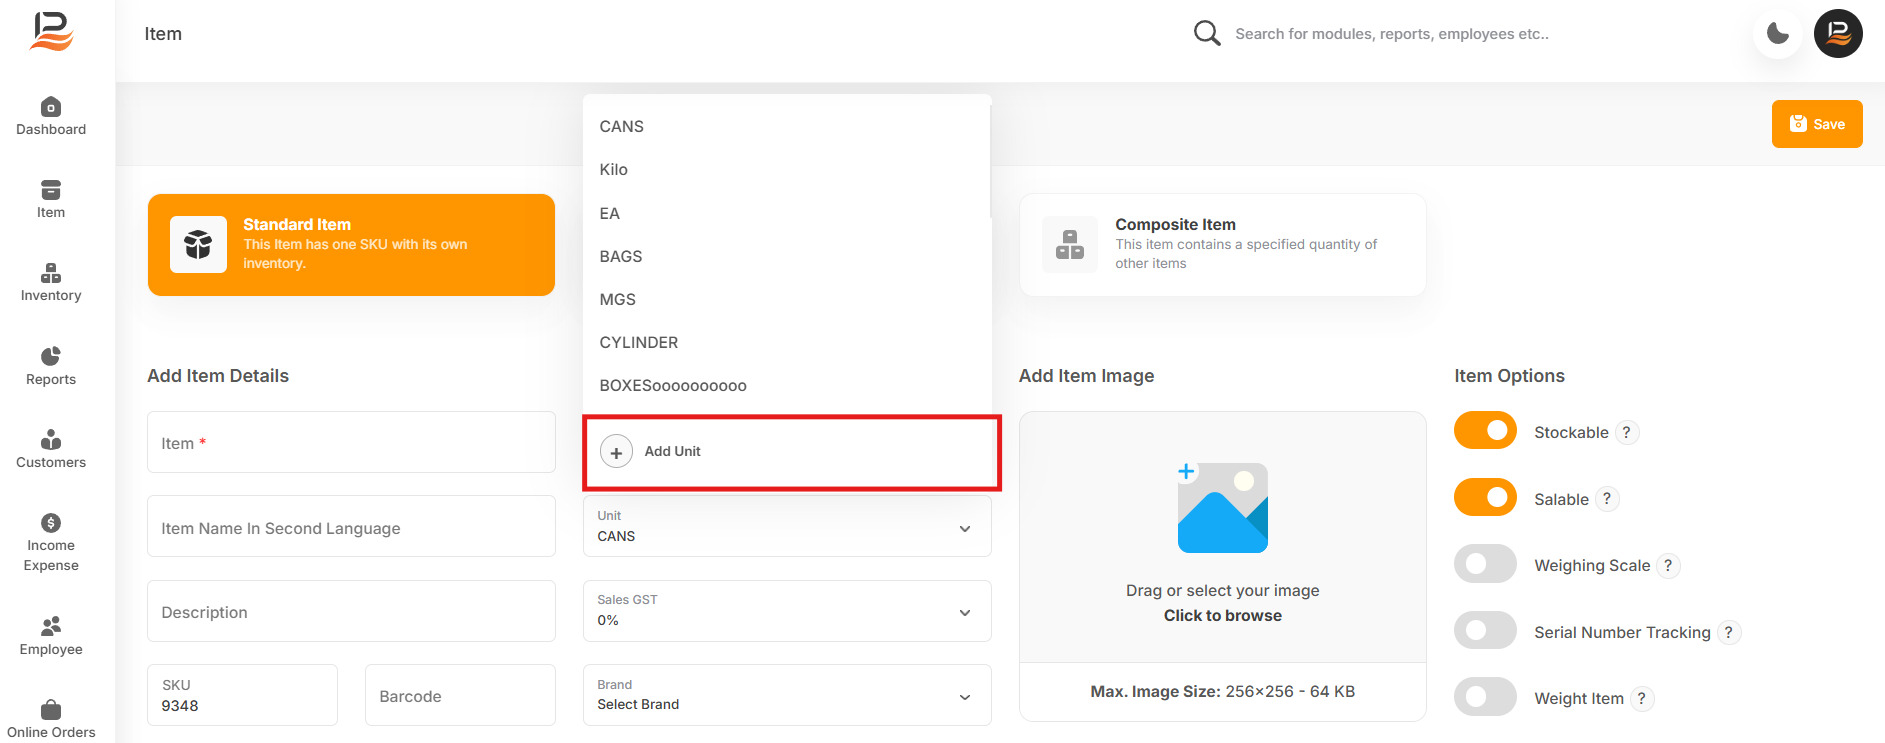
Unit
Select a Unit Of measurement for the product in the ‘Unit’ column. You can add a new UOM If required by clicking on ‘+Add Unit’ in the drop-down list, In LithosPOS, you can sell items in various units of measurement (UOMs) such as kilograms, numbers, liters, gallons, pieces, and more. -
Item second Language
In this column you can add item name in second language to display multiple name in the POS. -
Enter the Description
-
SKU
LithosPOS automatically generates an SKU Code, but you can edit this and enter your own SKU if needed. -
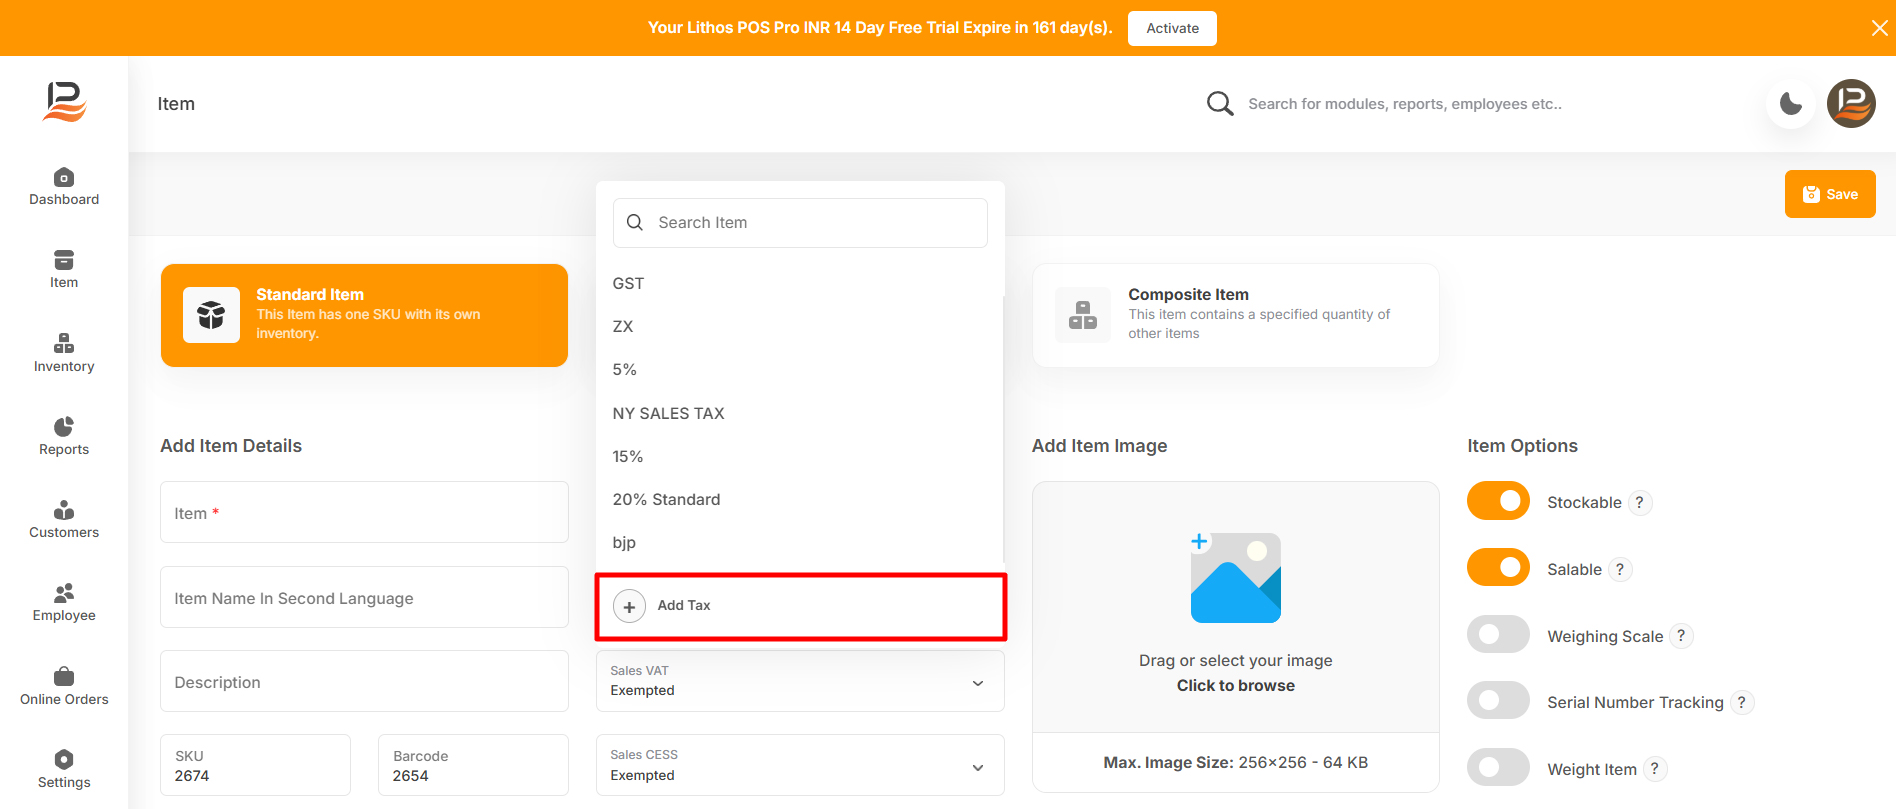
Tax
Select appropriate sales taxes/purchase taxes for the product or add new Tax. You can add a new tax if required. You can add multiple taxes for an item in LithosPOS.Note:
To add a new tax click on sales/purchase tax then click ‘+Add Tax’, a side window will open, enter a tax name, then enter the rate. Then click submit. If there are additional taxes or SESS in your country, you can manage them as well.
-
Enter the HSN
-
Brand
Select the brand for the product to get brand-based inventory and sales reports. You can add a new brand by clicking on “+Add Brand” then enter a brand name and submit. -
Modifiers
If you want to assign modifiers to this item select the already added modifiers from the list.
Note:
To select modifiers from the dropdown list, you must first add a modifier in the back office. To learn how to add modifiers, click this link.
Modifiers Option in LithosPOS
The Modifiers option in LithosPOS allows businesses to customize dishes or items according to customer preferences, providing greater flexibility and enhancing the customer experience. With this feature, you can offer additional choices like extra cheese, toppings, or specific dietary preferences such as vegan or gluten free items. It offers the following.
1. Custom Modifications
Extra Ingredients: Offer options like extra cheese, additional toppings, or sauces that can be added
to dishes, either with or without an extra cost.
Dietary Preferences: Easily accommodate requests for vegan, vegetarian, or non-veg modifications to
items.
2. Flexible Pricing
With Extra Cost: You can set additional charges for certain modifications, like adding premium
toppings or extra portions.
Without Extra Cost: Provide some modifications at no extra charge, allowing customers to personalize
their orders without affecting the price.
3. Enhanced Customer Experience
More Options for Customers: By offering a wide range of modifiers, you give your clients the ability
to tailor their orders exactly to their liking, leading to higher customer satisfaction.
-
Adding Image
Next, add an image to your product so employees and online customers have a visual reference for the item. The image size must be within the specified limit. [256x256, 64 KB]Note:
You can't add images to items while importing them in bulk; item images can only be added one by one.
-
Price
The item price details and various inventory details for each store are listed below. -
Retail price & markup
Enter the cost of the item, then enter either the markup or the retail price the subsequent column will be auto-calculated. Here the automatic markup calculation can be disabled in settings, to do that go to settings>general setting>navigate to features then toggle off the “Markup Automation” button, and click save. -
Minimum Retail Price
Input a minimum retail price to prevent underselling. The system will block any attempt to sell an item below this price. -
Reorder point
Then, set a reorder point to receive low stock alerts and generate purchase orders for low inventory. If the item reaches this threshold it will notify you via email and generate an alert on the dashboard. -
Activate
The toggle buttons against each store can be used to activate or deactivate an item in that particular store.Note:
To apply the entered details from one store to all the stores listed below, just click on the downward arrow next to each column. The data will be copied to all the stores below.
-
Item Options
-
Stockable
Turn ON the first button to mark the item as stockable. -
Salable
The 'Salable' button determines if the item can be sold. You can add non-salable items, such as ingredients used in combo dishes, to your inventory. -
Weighing scale
If this item requires a weighing scale toggle on the weighing scale button. -
Serial number tracking
For items requiring serial number tracking toggle on the Serial Number Tracking button. -
Weight Item
If it is a weight item, turn on the Weight Item button. Doing this will open a pop-up keyboard in the POS to enter the weight when adding this item to the sales cart. -
Favorites
Designate items as 'favorites' for quick access on the POS screen. Adding frequently sold items as favorites allows for faster and easier access during transactions. -
Veg
If it is a vegetable item toggle on the ‘Is Veg’ button. -
Online sale
Enable 'Online sale' to allow the item to sell online -
Service
Activate the 'Service' button to mark the item as a service. -
EBT
Then, turn on the EBT option if the item can be sold under EBT, which is only applicable in the US. -
Save
finally save the item.
Note:
Non salable items are used as ingredients and are not directly sold.
Note:
You have to install QK-order from integrations to show this ’Online Sale’ button.
-
Connect with us to know more
To learn more about it feel free to book a meeting with our team


 LithosPOS


